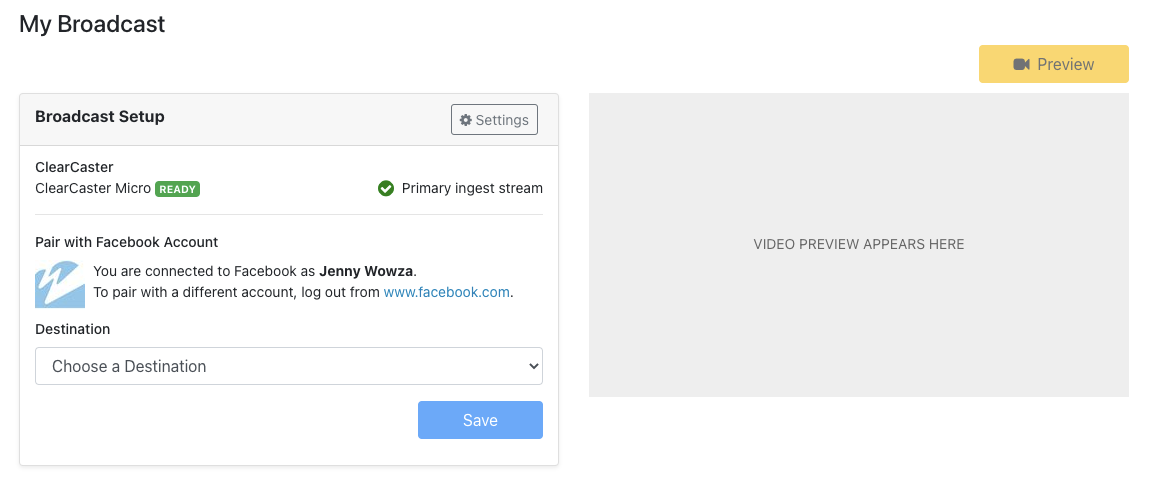
Learn how to manage Facebook Paired broadcast by adding or editing the paired Facebook account, broadcast title, and description; previewing, starting, and stopping the broadcast; and more.
Note: Wowza ClearCaster Encoder build 2.3.9.00 or later is required to use Facebook Paired functionality. See Update Wowza ClearCaster™ software for instructions on how to update the software on your Wowza ClearCaster appliance.
Before you start
You should have access to the following items:
- The Broadcast Setup page. This page is accessed through a Sharing URL that you created yourself or that was sent to you by someone with a Wowza ClearCaster account. You do not need a Wowza ClearCaster account to manage a Facebook Paired Broadcast, but you need a sharing URL and passphrase that can only be created by someone with a Wowza account. The creator of a Facebook Paired broadcast also manages it from the sharing URL and Broadcast Setup page. See Share management of a broadcast using Wowza ClearCaster to learn more about sharing URLs.

Pair or edit the Facebook account associated with the broadcast
- Click Pair Account on the Broadcast Setup page if the broadcast is not already paired with a Facebook account or Edit if it is.
Note: If you are already logged into Facebook, Wowza ClearCaster automatically pairs the broadcast to your account. To pair the broadcast to a different account, log out of Facebook and refresh the Broadcast Setup page.
- Enter your Facebook login credentials and click Log In.
- Select a Destination on Facebook to post your live stream:
Broadcasts marked as a backup ingest stream only show the option Attach to an Active Broadcast. Streams must be marked as the primary ingest stream by the creator of the Facebook Paired broadcast in the Create Broadcast dialog for all other destination options.
- Share on a Page you manage
- Share on your Timeline - If you select Share on your Timeline as your Destination, you can specify who can see the live stream post: Public, Friends of Friends, Friends, or Only me. A test broadcast will set the destination to your timeline with the privacy set to Only Me.
- Share in a Group
- Attach to an Active Broadcast - Select a specific active or scheduled broadcast associated with the paired Facebook account from the Active Broadcast list.
Note: Scheduled broadcasts do not appear in the Active Broadcast list until the broadcaster creates an event and sets up the live video in Facebook Live Producer.
- Test Broadcast - Sets the destination to your timeline with the privacy set to Only me.
- Click Save.
Broadcast ID and Live Video ID links appear. The Broadcast ID links to the broadcast destination on Facebook. The Live Video ID links to the broadcast on Facebook Live Producer.
- Enter a title and description to include in the Facebook post.
- Click Save.
Go live with your broadcast
Anyone with a sharing URL can take a broadcast live from the Broadcast Setup page.
- Click Settings, adjust the Audio Level slider to the desired audio gain for your broadcast, select the audio channel(s) for your video source, and click OK.
Note: You can adjust the audio level in decibels (dB) from -12db to +12db from the existing audio level. The single control adjusts the level for both of the stereo channels at the same time. To further optimize the audio settings and levels, or to mute the audio, refer to the documentation for your device that's providing the video input to the ClearCaster.
- Click Preview. A preview of the video appears. If the video includes captions, the captions also appear.
The encoder label next to the ClearCaster name changes from Offline to Preview. This encoder label can help determine the status of the ClearCaster at different points in the broadcast. The indicator appears as Ready or Offline when off air or idle, Optimizing Path to Facebook Live while loading the connection to Facebook's live video ingestion severs, and Live while the broadcast is live. - Click the Live Video ID link and confirm the video is also in preview in Facebook Live Producer.
Click Go Live in the Wowza ClearCaster Manager.
A Stop Streaming button and Monitor section appear on the page once the broadcast is live so you can view some live data about the broadcast and stop the stream at any time.
An End Facebook broadcast checkbox will appear if the broadcast is the primary ingest stream.
- If the End Facebook broadcast box is checked and you click the Stop Streaming button, the primary ingest stream and the broadcast on Facebook will end. You will need to stop each secondary ingest stream individually from the associated Broadcast setup page to end the stream.
- If the End Facebook broadcast box is not checked and you click the Stop Streaming button, only the primary ingest stream will end. The Facebook broadcast will fall over to the secondary ingest stream if there is one available.


