Wowza ClearCaster™ Manager enables you to easily configure, manage, and monitor Wowza ClearCaster live stream broadcasts. This article introduces the different parts of the Wowza ClearCaster Manager browser-based application to help you find your way around the user interface.
Get started
Before you can do much with Wowza ClearCaster Manager, you must set up your ClearCaster appliance and register it with your Wowza™ account.
To access Wowza ClearCaster Manager, go to clearcaster.wowza.com and sign in with your Wowza account.
Navigate Wowza ClearCaster Manager
![]()
| 1 | Click the tabs on the menu bar to access features that help you live stream broadcasts (the Broadcast tab), monitor your live and archived broadcasts (the Monitor tab), and manage your ClearCaster appliances along with integrated services and custom templates (the Manage tab). |
| 2 | Click the user name to switch to a different organization if you're a member of more than one or to sign out of Wowza ClearCaster Manager. |
Manage broadcasts
![]()
| 1 | Use the Broadcast tab to access a list of live and draft broadcasts associated with your Wowza account. From this page, you can create new broadcasts, manage existing broadcasts, and start and stop live broadcasts. |
| 2 | Click Create Broadcast to create a new broadcast. See Create and manage Wowza ClearCaster broadcasts. |
| 3 | View a list of all broadcasts currently associated with your Wowza account. Use this page to Edit, Share, and Delete your broadcasts, enable or disable stream targets associated with a broadcast, Go Live, see basic stream health information for live broadcasts, and Stop Broadcasts. You can also click Monitor to see more detailed stream health and performance data for a live broadcast. For more information, see Monitor live Wowza ClearCaster broadcasts. |
Configure broadcasts
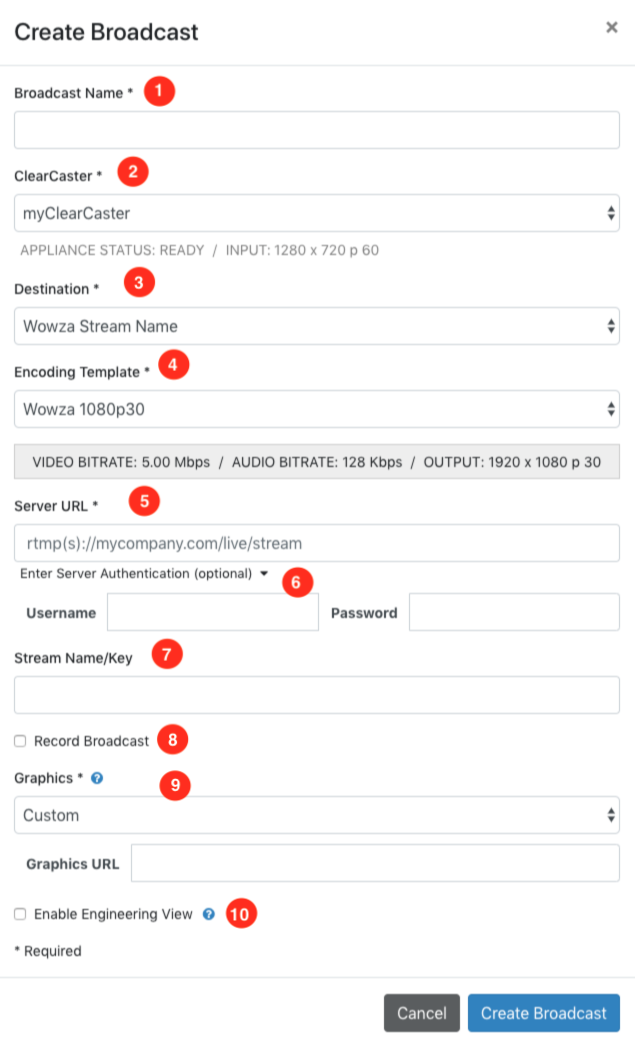
| 1 | Add a descriptive Broadcast Name so you can tell your broadcasts apart. We recommend including the destination and output settings in the name. |
| 2 | Select the ClearCaster appliance to use. |
| 3 | Select the Destination to which you want to stream the broadcast. Use one of the named destinations, such as YouTube or Twitter, or other options, such as General Multiple Targets to stream to multiple destinations. Select Wowza Streaming Engine to stream to a Wowza Streaming Engine instance or select Wowza Video to use a direct integration with the Wowza Video service. |
| 4 | Select an Encoding Template that is pre-tuned for your destination. Depending on the information required by your destination and template selections, additional required fields may appear in the dialog. |
| 5 | Specify the URL for your destination. |
| 6 | If your destination requires it, enter your server authentication Username and Password. For example, Wowza Streaming Engine instances require authentication for RTP and RTMP sources by default. |
| 7 | Enter your destination's Stream Name or Key. |
| 8 | Optionally, record the broadcast each time it goes live. |
| 9 | Optionally, select a Graphics built-in package. If you select Custom graphics, you must specify the Graphics URL. |
| 10 | Optionally, Enable Engineering View, which can provide additional stream health data on a connected HDMI external monitor. |
Monitor broadcasts
Monitor live broadcasts
![]()
| 1 | Use the Monitor tab to see detailed stream health and performance data for live and archived broadcasts. |
| 2 | On the Live Broadcasts tab, view detailed health and performance data for a single live broadcast. For more information, see Monitor live Wowza ClearCaster broadcasts. |
| 3 | Select a live Broadcast to monitor stream health and performance in near-real time.Note: The temperature of the capture card is only monitored for ClearCaster Micro appliances. It isn't monitored or displayed for ClearCaster Pro or ClearCaster Enterprise appliances. |
Monitor archived broadcasts
| 1 | Use the Monitor tab to see detailed stream health and performance data for live and archived broadcasts. |
| 2 | On the Archived Broadcasts tab, use filters to select an archived broadcast to review. |
| 3 | Click View to access detailed health and performance data for a specific broadcast. For more information, see Monitor archived Wowza ClearCaster broadcasts. |
Manage ClearCaster appliances, custom templates, integrations and more
Manage encoders
![]()
| 1 | Use the Manage tab to manage your ClearCaster appliances, including integrations and custom templates. |
| 2 | Click Encoders to access a list of Wowza ClearCaster appliances registered to your Wowza account. |
| 3 | On the Encoders tab, view a summary of each ClearCaster appliance for which your Wowza account has access. Click the gear icon to Rename or Delete a ClearCaster appliance.Note: Only admins can delete ClearCaster appliances. |
Manage templates
![]()
| 1 | Use the Manage tab to manage your ClearCaster appliances, including integrations and custom templates. |
| 2 | Click Templates to create and edit custom destination and encoding preset templates that you can access on the Broadcast tab when you click Create Broadcast. |
| 3 | Edit the encoding templates using the Template JSON editor. |
| 4 | Select the Encoder Model to access its associated Destinations and Encoding Templates. |
| 5 | Select a Destination to access its associated Encoding Templates. |
| 6 | Control copying and editing of templates with buttons that allow you to Edit a Copy, Edit This Template, Save Template, or Delete Template. |
| 7 | Click Manage Destinations to open a dialog where you can create, show or hide, reorder, or delete destinations. |
| 8 | Click Manage Templates to open a dialog where you can show or hide, reorder, or delete templates. You can also set a template as the default for a destination. |
Manage destinations
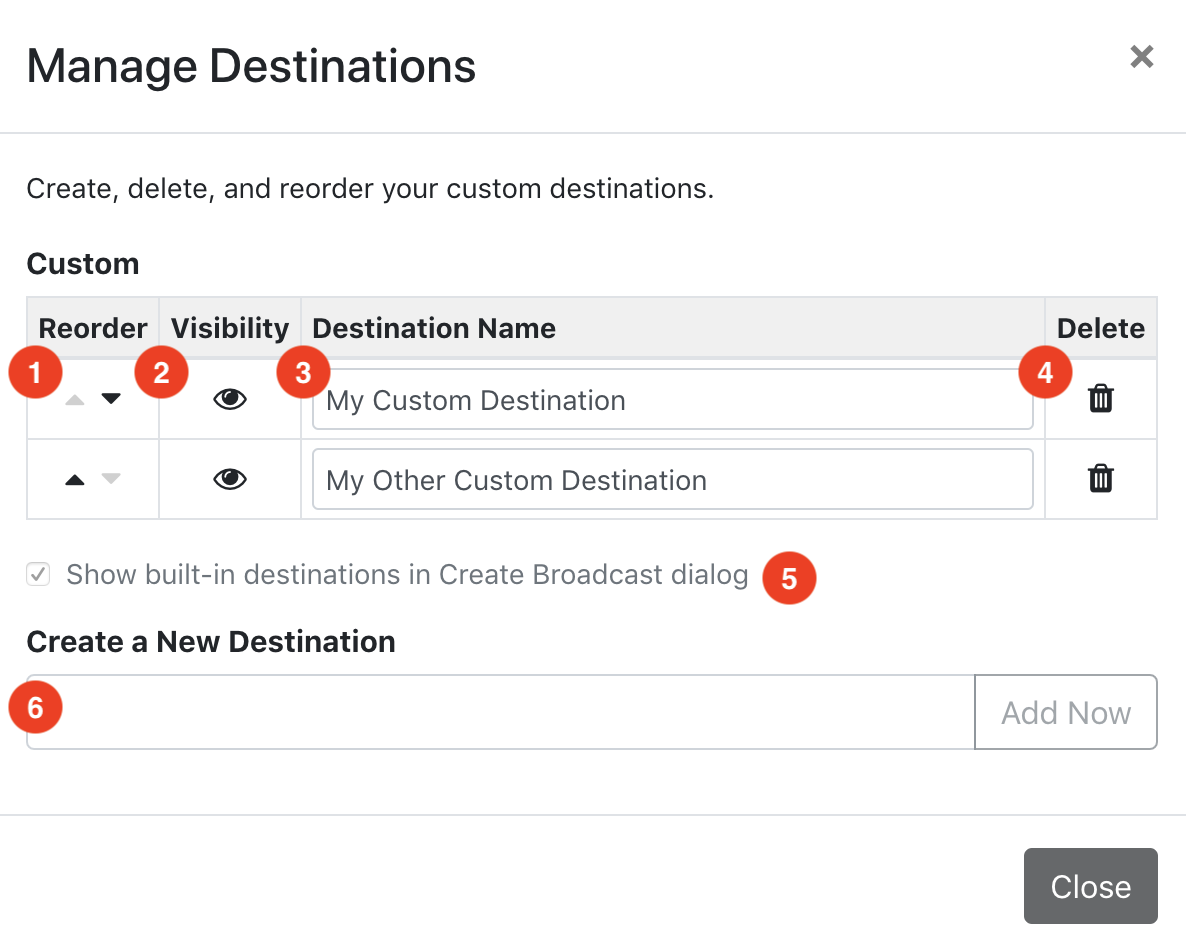
| 1 | Reorder custom destinations as they appear in the Create Broadcast dialog. |
| 2 | Control the Visibility of custom destinations in the Create Broadcast dialog. |
| 3 | Edit the custom Destination Name. |
| 4 | Delete a custom destination and all of its associated encoding templates. |
| 5 | Select Show built-in destinations in Create Broadcast dialog to reveal both built-in and custom destinations. Unselect to hide built-in destinations. |
| 6 | Create a New Destination to add a custom destination that will appear on the Create Broadcast dialog. |
Manage templates
![]()
| 1 | Select a Destination in order to manage its associated encoding templates. |
| 2 | Show or hide a destination and all of its associated encoding templates. |
| 3 | Reorder custom encoding templates as they appear in the Create Broadcast dialog. |
| 4 | Control the Visibility of custom encoding templates in the Create Broadcast dialog. |
| 5 | Set a custom template as the Default for its destination in the Create Broadcast dialog. |
| 6 | Edit the custom Template Name. |
| 7 | Delete a custom template from its associated destination. |
Manage integrations
![]()
| 1 | Use the Manage tab to manage your ClearCaster appliances, including integrations and custom templates. |
| 2 | Click Integrations to manage API keys and integrations with third-party services. You can add an API key and secret key to control your ClearCaster appliance through the Wowza encoder GraphQL API, and you can add or delete API keys and access keys for integration with the Wowza Video REST API. |
| 3 | Click Generate a New ClearCaster API Key to generate an API key and secret key to control your ClearCaster appliance through the Wowza encoder GraphQL API. |
| 4 | Click Add a Wowza Video API Key to associate your API key and access key from the Wowza Video REST API with your ClearCaster appliance. This allows direct integration with the Wowza Video service. |
| 5 | Click Add a LinkedIn Live Access Token to associate a LinkedIn Live access token with your ClearCaster appliance. This enables broadcasting directly to LinkedIn Live. |
Manage recordings
Recordings are available for 7 days under the Recordings tab.
![]()
| 1 | Use the Manage tab to manage your ClearCaster appliances, including recordings. |
| 2 | Click Recordings to see recordings that are completed or currently uploading. |
| 3 | Click Download to download an MP4 file of a completed recording. |
Manage users
![]()
| 1 | Use the Manage tab to manage your ClearCaster appliances. |
| 2 | Click Users to view a list of users that have access to your ClearCaster appliances. |
| 3 | Click Manage Support Users to open the Support tab of the My Account page. On the Support tab, you can add and remove support contacts from your account. Assigning a user as a support contact gives them access to your ClearCaster appliances in the Wowza ClearCaster Manager and allows them to open support tickets. For more information, see Get Help for Wowza ClearCaster. |
| 4 | Select the Limit Access To Admins Only check box to limit access to the Templates and Integrations tabs to users with admin rights. |
| 5 | Select the Admin check box to assign admin rights to a user. |
Manage graphics
![]()
| 1 | Use the Manage tab to manage your ClearCaster appliances. |
| 2 | Click Graphics to view and edit the built-in graphics packages. You can use the graphics packages to add titling and graphics overlays to a live broadcast. For more information, see Create and manage Wowza ClearCaster broadcasts. |
| 3 | Select a package from the list of built-in graphics packages. |
| 4 | Optionally, rename the graphics package. |
| 5 | Configure the titling and graphics overlays for the selected package. Use the slider to enable or turn off an overlay. To configure an overlay, click Edit. |


