


Live Streaming Equipment Setup: Create a Studio on the Cheap (Update)

So you’re building a studio to live stream out of and you need the right live streaming tools for the job. Congrats!
Since this is a studio, we’ll assume you have at least a bedroom or office-sized space to work in, with electric sockets readily available on each wall, wired gigabit internet upload speeds, and (ideally) carpet to help deaden the echo in the room. I’ll also assume that you have only one person operating all of the equipment during any given live production. Based on this foundation, here are a few suggestions for the live streaming equipment you’ll want to get and a few different setups that you can configure — along with the reasoning behind it all.
Table of Contents
- Video Cameras
- Audio Equipment
- Mixers, Switchers, and Encoders
- Additional Live Streaming Tools
- Live Streaming Equipment Setups
- Professional-Quality Streaming on a Budget
- Remote Camera Operations by One Person
- Streaming in Tight Quarters
- Remote Streaming With Limited Electrical Options
- How to Put It All Together and Get Streaming
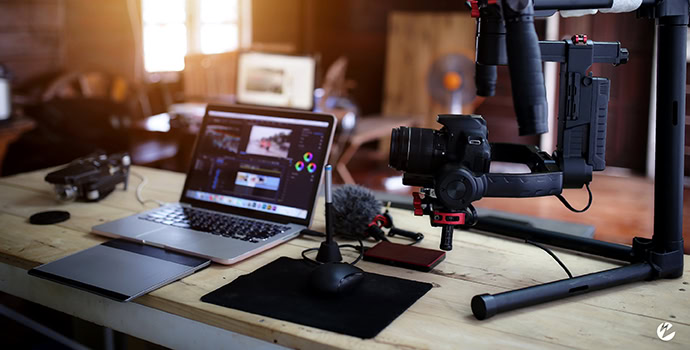
Video Cameras
Considerations
Always start with three cameras at 1080p resolution. The reason for this is simple. Most things that happen in front of the camera usually involve two subjects. Alternatively, some broadcasts involve one person interacting with an object. For these two scenarios, we can expect we’ll at least need one camera for a wide shot, and the other two cameras are for closeups on the subjects.
Knowing that you’ll need three cameras, I highly recommend these cameras are the same type, with settings that can be remotely configured. If you end up with cameras that use different sized sensors and different types of color filters, you end up with problems where the footage doesn’t match jumping from one camera to another, no matter how much you tweak the white balance or sharpness.
On the same note, keep them all using 1080p. Most displays for live streaming are geared towards 1080p resolution. If you are recording content that you plan to eventually edit down, 4K is not a bad option. And if you have the money and bandwidth, you can certainly consider 4K. But, being as this gear is designed for general live streaming, I’d keep it at 1080p.
My last recommendation is for size and personnel constraints. If you have a small room, and only one person to manage all the cameras, get mountable PTZ cameras (cameras that allow pan/tilt/zoom to be remotely controlled) and be sure to properly manage your cables. Having unruly cables spread across the floor with wide tripods is basically asking for something to be kicked over. Wall-mounted equipment with cable clips to keep Ethernet and HDMI cables held where they belong can go a long way to ensure your equipment won’t be broken. If you have more space and more people, then you have less to worry about (and probably a bigger budget).
Recommendations
For those with a small amount of space and people, please consider PTZOptics 12x-SDI Gen2 cameras. These cameras will give you the best flexibility for outputs, and can be controlled from either an infrared (IR) remote, manual controls, or applications that may even be built into the switcher. When choosing this option, you may want to run everything with Ethernet cat-6 cables.

For those with more room to breath and people to run cameras, the blackmagic studio camera is a nice budget-oriented option.
Combined with the ATEM switcher, iris, f.stop, color balance, focus, and zoom can also be controlled remotely. Focus and zoom can only be controlled if the following lenses are used:
- Panasonic Lumix G X Vario PZ 45-175mm f/4-5.6 ASPH. POWER O.I.S. Lens
- Olympus M.Zuiko Digital ED 14-42mm f/3.5-5.6 EZ Lens
Please keep in mind that all remote options are managed through SDI cables.
Audio Equipment
Considerations
While I could go into a number of considerations for audio, I generally don’t. In a small room for a live shoot, shotgun mics are not that great, ceiling-mounted or otherwise, and pressure zoom microphones (PZMs) pick up too much vibration. I like to keep it simple and cut clutter to a minimum.
Get two lavalier microphones, preferably wireless. You’ll also need a mixer to run them through for better audio into the switcher and possible phantom power.
Recommendations
I have used sennheiser for over a decade with great results. Otherwise, for a little cheaper, you may want to consider Rode Wireless Go. I don’t think you’ll be disappointed with either. If you have to go wired, checkout the Audio-Technica Pro 70 Lavalier.

I keep those around for backup. They allow for phantom power through batteries or the mixer.
Mixers, Switchers, and Encoders
Audio Mixer
Generally speaking, it’s better to keep your audio and video on separate systems. For the audio mixer, I like to keep it simple with something like Mackie where I can make sure I have at least two XLR inputs for the two lavalier mics.

Now I say generally, but certainly it is possible to send your audio into the switcher directly from the cameras themselves. Honestly, I hate doing this. But depending on your situation, sometimes it’s easier. In cases where I’m using cameras with XLR connections, I’ll consider it. I’ll tie the lavalier to the camera point at the subject the mic is staying on, and it keeps me remembering which mic is for whom.
Video Switcher
I can then control everything through the ATEM switcher. Oddly though, I’ve had issues where the compression made the audio sound a bit off. So again, I prefer to keep it separate though an audio mixer when possible.
That said, I love blackmagic ATEM switchers. You can get a 4K or HD version that will allow software controls of the cameras and audio. This allows you to add lower-thirds, graphics, and a slew of options. If the price is too high, you might want to consider an ATEM Mini.

The ATEM Mini is an amazing low-budget option. it’s got software functions to add graphics, switch on preview, and even change the size of the picture-in-picture options. However, the ATEM mini is not a way to control external equipment, as it’s only for HDMI connections, and requires the total length of HDMI cable used between a maximum of four cameras and it’s final output does not exceed 200ft. For the price, this is an amazing switcher, and for cameras like PTZOptics, I wouldn’t hesitate to buy them.
Encoder
When it comes to software encoders, we recommend Vmix, Wirecast, and the free option of OBS Studio.
All these provide a great way of making an amazing production and implementing additional digital control and controls. However, you will need a powerful computer to manage everything, and a way to bring in feed from three different cameras. There are two solutions for this.
Additional Live Streaming Tools
If you’re using SDI cables, I’d consider the AJA Mobile I/O, or the Desktop I/O. This will work great with Wirecast or Vmix. In my own testing of the equipment, the system got hot as hell sending four streams of 4K through it. But it did its job.

The other alternative is via IP. The PTZOptics cameras are essentially IP cameras and can send the video feed via RTSP to any of the mentioned digital switchers. There are also plugins available to allow you control of the cameras through these same switchers.
As Vmix, Wirecast, and OBS Studio also work as encoders, you can easily send the output via RTMP to social media, or to Wowza Streaming Cloud, which can feed it to your own website as well as multiple targets.
Live Streaming Equipment Setups
There are a variety of ways you can configure the live streaming equipment listed above. However, to simplify matters, I’ve broken it down into SDI/HDMI/IP connections going to hardware/software switchers.
Professional-Quality Streaming on a Budget
4K SDI to Hardware Switcher (Can Be Used for 1080p)
Cameras: 4K Blackmagic Studio Cameras
Audio: Sennheiser Wireless Microphone System
Switcher: 4K Blackmagic ATEM Switcher
Encoder: Wowza ClearCaster
Additional Equipment: Blackmagic Mini Converter SDI Distribution 4K is needed to connect all three cameras to the ATEM for camera and lens control.
Note: This is the standard system we’ve set up in our studio for both live streaming and recording. 4K allows for editing a higher resolution copy. Blackmagic 4K video assists are used for local recording. Camera settings and lens control is done through the ATEM switcher, but the camera movement is controlled by camera operators.
Remote Camera Operations by One Person
1080p SDI to Software Switcher
Cameras: PTZOptics
Audio: Sennheiser Wireless Microphone System
Switcher: Vmix (Windows) or Wirecast (Windows or Mac)
Encoder: Same as Switcher
Additional Equipment: AJA Mobile I/O to bring video signals into the switcher
Note: This system also allows the option to output with the AJA Mobile I/O to Wowza Clearcaster if using the switching software for encoding requires more CPU usage than it can handle. The PTZ Optics cameras cannot be controlled from within the software unless connected through ethernet cables. However, using the IR Remote is a great solution.
Streaming in Tight Quarters
1080p HDMI to Hardware Switcher
Cameras: PTZOptics or standard HDMI cameras
Audio: Rode Wireless Go system
Switcher: BlackMagic ATEM Mini
Encoder: Wowza Clearcaster
Note: This is a more economical solution for many. HDMI cameras can be static, or PTZOptics cameras can be controlled with an IR Remote. The ATEM Mini will reduce the distance away from the switcher the cameras can be placed, but it’s a good solution for a small room or even remote locations.
Remote Streaming With Limited Electrical Options
1080p IP Connection to Software Switcher
Cameras: PTZOptics or other IP cameras
Audio: Rode Wireless Go system
Switcher: Vmix (Windows) or Wirecast (Windows or Mac)
Encoder: Same as Switcher
Additional Equipment: 5-port PoE Router, Mackie Producer 2X2 USB Audio Interface
Note: As a simpler option where both power and video connections occur through cat-6 Ethernet cables, this setup will require at least a 5-port PoE Router that sends the power. The software switcher also can control the cameras. You can push audio through the cameras, but you may want to consider getting an audio interface like the Mackie Producer 2X2 USB Audio Interface.
How to Put It All Together and Start Streaming
Once you’ve captured, mixed, and encoded the content, it’s time to stream it out of your studio for processing and delivery. First, you’ll want to send your stream to a media server, where it can be transcoded for adaptive bitrate delivery and repackaged for seamless playback on a wide range of end-user devices. A live streaming server software or cloud streaming service can be employed to accomplish this and more.
From there, a content delivery network (CDN) should be leveraged for global distribution. CDNs
are networks of geographically distributed servers used to transport media files. Using a CDN is the fastest, most reliable way to get your content in front of numerous viewers anywhere in the world.
Free streaming platforms like Facebook Live often have their proprietary CDN or partner with another provider. If you’re streaming directly to one of these sites without simulcasting or hosting the event on your own website, then video delivery is already taken care of.
Alternatively, if you’re streaming content with Wowza, we offer the Wowza CDN, as well as integration with Akamai, Fastly, Microsoft Azure, and a number of social media sites.
It’s as simple as that. With the right live streaming tools and equipment setup, you’ll be set to broadcast live to all your viewers while meeting the budget that’s best for you.