Learn how to use the Hauppauge StreamEez-Pro HD video encoder as the video source for a Wowza Video™ live stream. The Hauppauge StreamEez-Pro HD video encoder can publish H.264-encoded live streams up to 1080p to the Wowza Video™ service. When you choose Hauppauge as your video source, Wowza Video generates a connection settings file that you can use to easily connect the StreamEez-Pro to Wowza Video.
To learn about other live stream settings you might see in the user interface, see Live Stream Setup page in Wowza Video.
1. Create a live stream
If you haven't already done so, create a live stream in Wowza Video that uses the Hauppauge StreamEez-Pro encoder as the video source.
- Sign in to Wowza Video.
- Click Add Live Stream.
- On the Live Stream Setup page, enter a Live Stream Name, choose a Broadcast Location, and then click Next.
- On the Video Source and Transcoder Settings page, select Hauppauge as the encoder you want to use to connect to Wowza Video.
- Specify other video source settings, click Next, and complete the steps to finish creating the live stream.
Wowza Video creates the live stream and displays the Overview tab of the live stream detail page.
2. Connect the Hauppauge StreamEez-Pro to Wowza Video
After you've added a live stream in Wowza Video, configure the StreamEez-Pro to connect to it by using the XML connection settings file that Wowza Video generated for the live stream.
- On the Live Streams page of Wowza Video, select the live stream that uses Hauppauge as its video source.
- Click the Video Source and Transcoder tab of the live stream detail page.
- Under Download Configuration File, click Download.

- Copy the downloaded file, Hauppauge.xml, to the computer that has the StreamEez Dashboard installed.
- On the Basic tab of the StreamEez Dashboard, click Streaming Service and choose Wowza Streaming Engine. Then, click Browse to locate and open the Hauppauge.xml configuration file.
- Click Refresh to import the Configuration Data from Wowza Video.
- In the StreamEez Dashboard, configure any other required settings for your broadcast.
3. Test the connection
- In Wowza Video, select the live stream that uses the Hauppauge StreamEez-Pro as its video source.
- Click Start Live Stream at the top of the live stream detail page.
- Click Start to confirm that you want to start the stream.
Wowza Video opens the stream and connects with the StreamEez-Pro encoder.
- In the StreamEez-Pro Dashboard, start your video source.
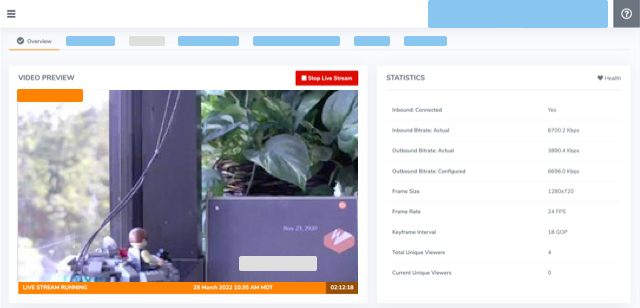
- In the Wowza Video web manager, confirm that the live stream is playing by looking at the Video Preview in the Overview tab of the Live Stream Details page.
The video preview displays a frame from the live stream every 5 seconds. The started date and time appear under the preview. Source stream, transcoder, and delivery metrics begin to update.

- Click Stop Live Stream at the top of the live stream detail page to end your test stream, and then stop the stream in the StreamEez-Pro encoder.
Note: If you configure a camera or encoder to push video to the Wowza Video service, it may take up to 10 seconds once the live stream or transcoder has started for the encoder to connect. This is due to DNS lookup of the host server's IP address. For a more immediate connection, in the encoder settings, use the IP address that's visible in Wowza Video after the live stream or transcoder has started. See Speed up the connection to a transcoder in Wowza Video for more information.


