Stream targets in the Wowza Streaming Engine™ media server software allow you to send live streams to widely distributed destinations. For example, you can send a live stream from a server running Wowza Streaming Engine and publish it directly to an external target, such as Wowza Video or a media storage bucket in the cloud.
With Wowza Streaming Engine 4.8.26, we introduced a push-based workflow that delivers your Common Media Application Format (CMAF) HLS streams to Wowza Video and supported cloud providers like Oracle and AWS.
This article explains how to create Wowza Streaming Engine stream targets to achieve these workflows. With a successful setup, you can send CMAF segments and HLS playlists to Wowza Video and certain cloud providers while playing the stream over our Fastly edge network. You can also ingest or transcode to the HEVC/H.265 codec, generate HLS output with the CMAF packetizer, and deliver single or adaptive bitrate live streams for playback.
Before you start
Before you add your CMAF stream target for distribution, complete these tasks:
- If sending your CMAF HLS stream to Wowza Video, generate a JWT access token in Wowza Video.
- Create a live application in Wowza Streaming Engine Manager. Configure your application to use the CMAF packetizer via Wowza Streaming Engine Manager or the Application.xml method.
If you plan to send your CMAF HLS stream to a cloud provider, you need:
- An Amazon Web Services account with create, read, and write access to S3 storage using access key security credentials. See AWS Free Tier and Creating a bucket for additional instructions. You can also reference the Create a bucket in AWS S3 section in our documentation for additional help.
- An Oracle Cloud account with create, read, and write access to bucket storage using access key security credentials. See Oracle Cloud Free Tier and Managing buckets for additional instructions.
Push a CMAF HLS stream to Wowza Video from Wowza Streaming Engine Manager
This section explains how to create and push a CMAF HLS stream target to Wowza Video for distribution from Wowza Streaming Engine Manager.
We assume you've already created a Live (Single server or origin) application, which was configured to use the CMAF packetizer. For help with these tasks, see Create applications and Stream using CMAF with Wowza Streaming Engine.
Note: The CMAF HLS push-based workflow closely resembles the process to Push streams to Wowza CDN from Wowza Streaming Engine. However, you must configure your application to use the CMAF packetizer and select the CMAF protocol when adding your stream target.
1. Add the CMAF HLS stream target
Use these steps to add the stream target in Wowza Streaming Engine Manager.
Note: In Step 6, make sure to select the CMAF-HLS protocol to package your stream target for delivery.
- In Wowza Streaming Engine Manager, click the Applications tab.
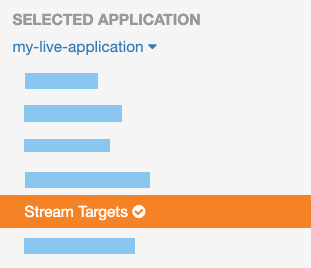
- Select your live application from the list.
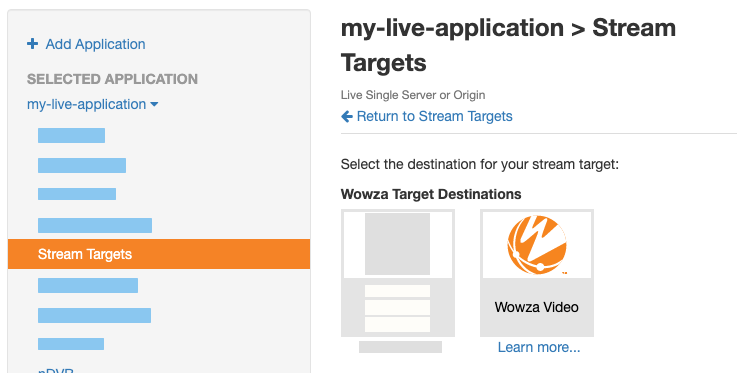
- From the selected live application, click Stream Targets in the contents panel.
- On the Stream Targets page, click the Add Stream Target button.
- Select Wowza Video from the Wowza Target Destinations options.
- Complete the fields on the Wowza Video Configuration page.

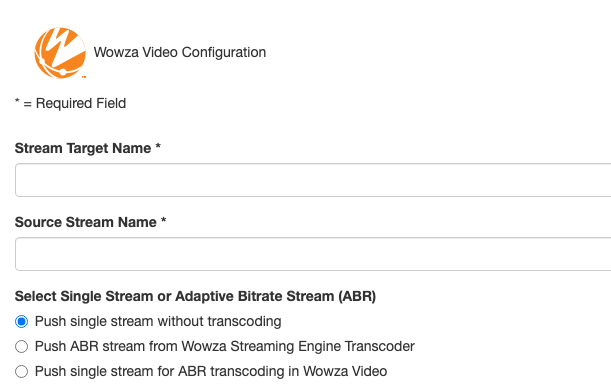
- Stream Target Name (required): Enter the name of the stream target. Use a name to help you identify it from other stream targets.
- Source Stream Name (required): Add the name of the incoming source stream you plan to send to the destination. Whether you're pushing a single stream or an adaptive bitrate stream, the value in this field should match the stream's name as it appears on the Incoming Streams page.
- Select Single Stream or Adaptive Bitrate Stream (ABR):
- Push single stream without transcoding: Select to upload and push a single stream to Wowza Video without any transcoding.
- Push ABR stream from Wowza Streaming Engine Transcoder: Select to upload and push a group of transcoded streams for adaptive bitrate content. With this option, when sending a set of adaptive bitrate renditions to a CDN endpoint, you must enable the Wowza Streaming Engine Transcoder feature to produce renditions with the same stream name prefix. The stream target uses the Source Stream Name prefix to find all stream names beginning with this prefix, then pushes all matching transcoded renditions while ignoring the original input stream. For example, myStream would match myStream_360p and myStream_720p, but not myStream.
- Push single stream for ABR transcoding in Wowza Video: Select to upload a single stream and send it to Wowza Video for transcoding. For more, see Send a stream from Wowza Streaming Engine for transcoding in Wowza Video.
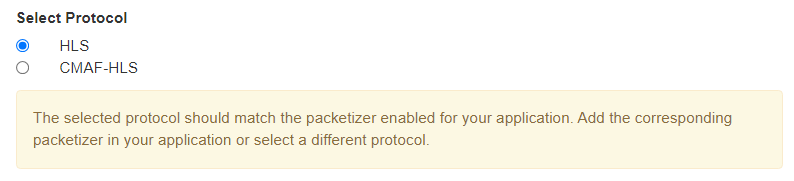
- Select Protocol: This selection is only available when you're not pushing a single stream for ABR transcoding in Wowza Video. Select the protocol that determines the packetizer for the stream target you create. The protocol should match the packetizer enabled for your application. By default, the selected option matches the packetizer you've configured for the application.
- HLS: Select this option to package and deliver your stream target using the HLS protocol.
- CMAF: Select this option to package and deliver your stream target using CMAF and the HLS protocol.
- Select Wowza Video Region: Indicate the location of the Wowza Video server to which the streams will be pushed. For the best performance and most reliable stream, choose the region closest to the physical location of your Wowza Streaming Engine instance. You cannot edit the region once the stream target is created. You must create a new stream target to select a new region.
- Wowza Video API Token (required): Paste your Wowza Video API token when adding it for the first time. Its value is saved and can be edited later. This token is set up at the application level, superseding any tokens in the Server.xml file. If you're using multiple Wowza Video accounts, create different applications in Wowza Streaming Engine for them. Existing Wowza Video customers can use the Access Token Management page to manage their personal tokens. See Generate an access token (JWT) for additional instructions. For those new to Wowza Video, see Wowza Streaming Engine with Video to get started.

Note: After the initial entry, the Wowza Video API token is obfuscated on all Wowza Streaming Engine Manager pages. You can never view the original API token again. Only the last five characters display if you edit the Wowza Video stream target or when you view the application's custom properties. This token is also displayed in its encrypted form in XML files. If something happens to this key or if you need to update it, you must revoke it and create a new personal token.
- Click Add this target to save the configuration.
Note: At this point, the Application.xml file containing all configurations for your application is updated to contain the API token value you added in this section.
2. Enable the stream targets feature
Existing stream targets aren't active until the stream target feature is enabled in Wowza Streaming Engine Manager. To enable this feature for your live application, follow these steps.
- Go to the contents panel of your live application and click Stream Targets.
- On the Stream Targets page, click Enable Stream Targets.
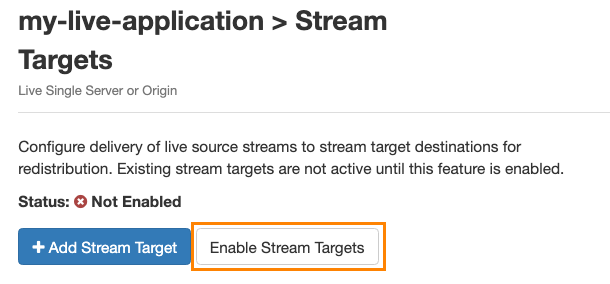
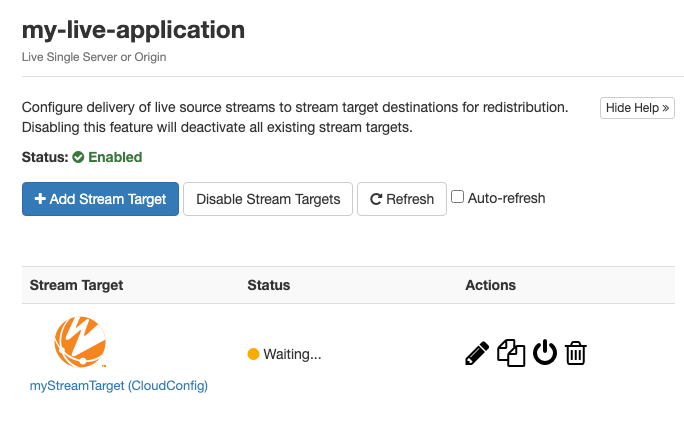
When stream targets are enabled, a checkmark appears next to the Stream Targets text in the contents panel. The Stream Targets page shows the status as Enabled.
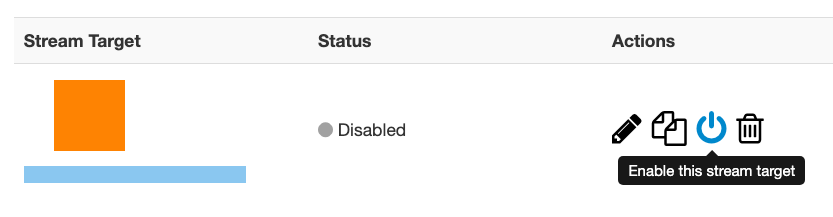
- If the status of an individual stream target is Disabled, click the corresponding Enable icon in the Actions column for that stream target.

When a stream target is enabled, its status on the Stream Targets page is set to one of the following:
- Waiting: The target is enabled but is not yet pushing the stream to the target destination because either the target's configured source stream is not connected to the Wowza Streaming Engine input, or Wowza Streaming Engine has not completed initializing the connection to the target destination.
- Active: The Wowza Streaming Engine instance successfully connected to the target destination. It's actively pushing the stream.
- Error: The Wowza Streaming Engine instance unsuccessfully tried to connect to the target destination. Ensure the target's configured source stream is connected to the Wowza Streaming Engine input. Errors might be due to an incorrect target configuration, an issue with the destination server, or an invalid Wowza Video API token.
Note:
- The status of each stream target updates automatically if your Wowza Streaming Engine application has fewer than 100 stream targets. If your application has more than 100 stream targets, you can click Refresh to update the status.
- When you push a single stream for adaptive bitrate transcoding in Wowza Video, the stream target cycles through statuses a bit differently. For more details, see Push to Wowza Video for transcoding.
- When prompted, click Restart Now so your change takes effect.
3. Send the CMAF HLS stream to Wowza Video
Once the stream target is created and enabled, you can check its status and push it to Wowza Video for distribution and delivery.
- Go to the contents panel for your live application and click Stream Targets. The status of the stream target initially appears as Waiting.
- Start a stream and send it to your Wowza Streaming Engine server. For more about publishing live streams, see Connect a live source to Wowza Streaming Engine.
- To verify your incoming stream, check the Incoming Streams page for your application. Incoming adaptive bitrate streams include the transcoded versions of your stream.
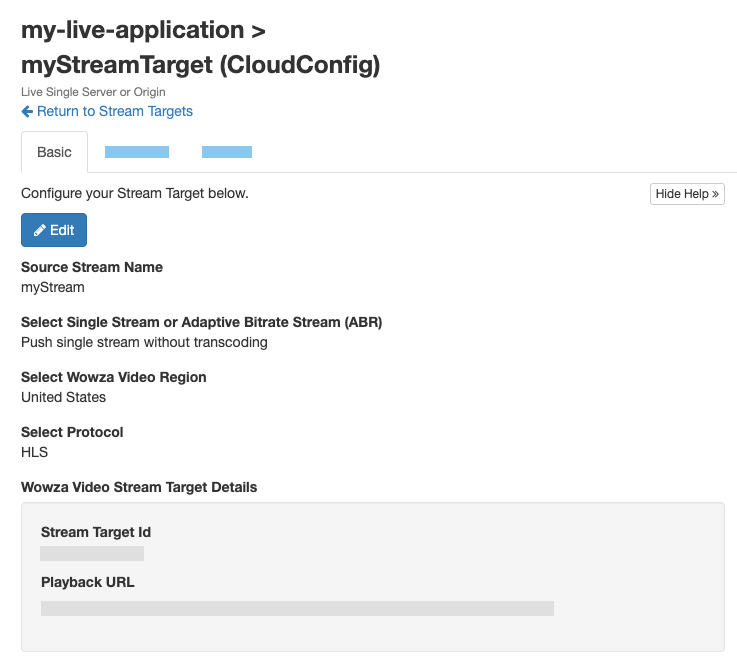
- When you publish the live stream, the status of your stream target changes to Active. Playback URL and Stream Target Id are imported from the Wowza Video CDN service. To view these details, click the stream target name in Wowza Streaming Engine Manager. For more, see About playing Wowza Streaming Engine streams.
Push a CMAF HLS stream to Wowza Video using a map file
This section explains how to create and push a CMAF HLS stream target to Wowza Video for distribution using a PushPublishMap.txt file.
When you edit this map file, you can manually instruct Wowza Streaming Engine to send the source stream to Wowza Video. It may be helpful to review information about Editing the push publishing map file. Depending on your scenario, toggle between the Single stream and Adaptive bitrate stream tabs for instructions.
Single bitrate streams
Use these steps to send a single rendition of your CMAF HLS stream to Wowza Video for distribution. You'll use the wowza-cdn profile parameters to accomplish the same configuration you can add via the Wowza Streaming Engine Manager user interface. This doesn't require the Transcoder to be enabled in your live application.
- Add your Wowza Video JWT access token as a property in the Application.xml file for your live application. For help, see Wowza Streaming Engine Application.xml configuration reference:
  <Properties>
    <Property>
      <Name>wowzaVideoApiToken</Name>
      <Value>[your-token-value]</Value>
      <Type>String</Type>
    </Property>
  </Properties>
- Locate and edit the PushPublishMap.txt file. The default map file location is [install-dir]/conf/[application]/PushPublishMap.txt. The map file is automatically created for you in this location when you enable the stream targets feature.
- Add a new entry to the PushPublishMap.txt based on this sample entry:
myStream_wv_cmaf_720p={"entryName":"wowza-video-cmaf-myStream-720p", "profile": "wowza-cdn", "wowzaVideo.region": "us", "destinationName": "wowzavideocdn", "childProfile": "cmaf-wowza-video", "group.streamMatcher": "nameSingle"}
- Start your myStream_wv_cmaf_720p stream and send it to your Wowza Streaming Engine server. For more about publishing live streams, see Connect a live source to Wowza Streaming Engine.
- Verify your incoming stream using Step 3 in the Send the CMAF HLS stream to Wowza Video section.
Adaptive bitrate streams
Use these steps to send a group of transcoded live stream renditions of your CMAF HLS stream to Wowza Video for distribution. You'll use the wowza-cdn profile parameters to accomplish the same configuration you can add via the Wowza Streaming Engine Manager user interface. This requires that the Transcoder is enabled in your live application.
- Add your Wowza Video JWT access token as a property in the Application.xml file for your live application. For help, see Wowza Streaming Engine Application.xml configuration reference:
  <Properties>
    <Property>
      <Name>wowzaVideoApiToken</Name>
      <Value>[your-token-value]</Value>
      <Type>String</Type>
    </Property>
  </Properties>
- Locate and edit the PushPublishMap.txt file. The default map file location is [install-dir]/conf/[application]/PushPublishMap.txt. The map file is automatically created for you in this location when you enable the stream targets feature.
- Add a new entry to the PushPublishMap.txt based on this sample entry:
myStream_wv_cmaf_abr={"entryName":"wowza-video-cmaf-myStream-abr", "profile": "wowza-cdn", "wowzaVideo.region": "us", "destinationName": "wowzavideocdn", "childProfile": "cmaf-wowza-video", "group.streamMatcher": "namePrefix"}
- Start your myStream_wv_cmaf_abr stream and send it to your Wowza Streaming Engine server. For more about publishing live streams, see Connect a live source to Wowza Streaming Engine.
- Verify your incoming stream using Step 3 in the Send the CMAF HLS stream to Wowza Video section.
Push a CMAF HLS stream to a cloud provider using a map file
This section describes the steps to push CMAF HLS stream targets to a cloud provider for distribution by using the PushPublishMap.txt file.
When you edit this map file, you can manually instruct Wowza Streaming Engine to send the source stream to your target cloud provider. It may be helpful to review information about Editing the push publishing map file.
Note: The current implementation of this feature only provides support for Oracle and AWS media storage locations.
Send a CMAF HLS stream to an Oracle bucket
Once you have created your Oracle bucket and recorded your credentials, add a new map entry to the PushPublishMap.txt file. Depending on your scenario, toggle between the Single stream and Adaptive bitrate stream tabs for instructions.
Single bitrate streams
Use these steps to send a single rendition of your CMAF HLS stream to an Oracle destination for distribution. This doesn't require the Transcoder to be enabled in your live application.
- Locate and edit the PushPublishMap.txt file. The default map file location is [install-dir]/conf/[application]/PushPublishMap.txt. The map file is automatically created for you in this location when you enable the stream targets feature.
- Add a new entry to the PushPublishMap.txt, setting the parameters in the following table. For more, see About map profiles.
| Name | Description |
|---|---|
|
entryName (required) |
A descriptive name for the map entry and stream target that's used in logging. The entry name must be unique for every map entry in PushPublishMap.txt. |
| streamName (required) | A descriptive name for the destination stream. It's sufficient to set this to the same value as the map entry. The value serves as the folder name for your assets in the Oracle bucket. |
| profile (required) | Defines how the stream is sent to its destination and determines which additional configurable parameters are available. Set to cmaf-cloudstorage. |
| cloudstorage.provider (required) | Defines the intended cloud storage provider for the stream destination. Set to Oracle. |
| cloudstorage.bucketName (required) | Set to the name of your Oracle bucket. |
| cloudstorage.region (required) | Set to the bucket region provided by Oracle. |
| cloudstorage.accessID (required) | Set to the Access Key ID provided by Oracle. |
| cloudstorage.secretAccessKey (required) | Set to the Secret Access Key provided by Oracle. |
| cloudstorage.namespace (required) | Set to the Object Storage namespace for the top-level container for all Oracle buckets and objects. |
| debugLog (optional) | Set to true to enable stream-level debugging. For more, see Stream-level debug. |
| http.relativePlaylists (optional) | Set to true to use only relative URL references in the playlists and manifests sent to the destination. The default is false. |
| http.playlistCount (optional) | The number of chunks to maintain in the playlist when it's pushed. The default value is 0, meaning the live stream packetizer PlaylistChunkCount property value in the application configuration specifies the playlistCount. For the cupertinoPlaylistChunkCount property, the default value is 3. |
| adaptiveGroup (optional) | The name of the adaptive group to which this stream target belongs. This creates a top-level folder in the bucket with the adaptiveGroup name. Inside the top-level folder, you can find the playlist and a separate folder with the chunklist and segments. |
Your PushPublishMap.txt file should look like the following sample:
myStream_oracle_cmaf_720p={"entryName": "oracle-cmaf-myStream-720p", "streamName": "myStreamCMAF720p", "profile": "cmaf-cloudstorage", "cloudstorage.provider": "Oracle", "cloudstorage.bucketName": "[oracle-bucket-name]", "cloudstorage.region": "[oracle-region]", "cloudstorage.accessID": "[oracle-access-id]", "cloudstorage.secretAccessKey": "[oracle-secret-access-key]", "cloudstorage.namespace": "[oracle-bucket-namespace]", "debugLog": false, "http.relativePlaylists": false, "http.playlistCount": "15", "adaptiveGroup": "oracle-cmaf-group"}
- Start your myStream_oracle_cmaf_720p stream and send it to your Wowza Streaming Engine server. For more about publishing live streams, see Connect a live source to Wowza Streaming Engine.
- Go to your Oracle Cloud account and refresh the Oracle bucket. Using the sample entry from Step 2, you should see the following folder structure:
  |-- oracle-cmaf-group → (top-level folder if adaptiveGroup included)
      |-- myStreamCMAF720p → (folder based on streamName with chunk lists for audio and video)
    	  |-- 5it4zacw → (folder with header and media files)
          |-- chunklist_ao.m3u8
          |-- chunklist_vo.m3u8
      |-- playlist.m3u8
This publishes a stream in your Oracle bucket named myStreamCMAF720p, with a top-level folder based on the adaptiveGroup parameter when included. Without the adaptive group specified, this is the folder structure instead:
  |-- myStreamCMAF720p → (folder based on streamName with chunk lists for audio and video)
      |-- 5it4zacw → (folder with header and media files)
      |-- chunklist_ao.m3u8
      |-- chunklist_vo.m3u8
      |-- playlist.m3u8
- The URL path to play back the file from the Oracle bucket takes this format if an adaptive group is included:
https://objectstorage.[region].oraclecloud.com/n/[namespace]/b/[bucket-name]/o/oracle-cmaf-group/playlist.m3u8
https://objectstorage.[region].oraclecloud.com/n/[namespace]/b/[bucket-name]/o/[adaptive-group]/playlist.m3u8
Without the adaptive group, the URL path changes to include the streamName parameter instead:
https://objectstorage.[region].oraclecloud.com/n/[namespace]/b/[bucket-name]/o/myStreamCMAF720p/playlist.m3u8
https://objectstorage.[region].oraclecloud.com/n/[namespace]/b/[bucket-name]/o/[stream-name]/playlist.m3u8
Note: As an alternative for the single-bitrate workflow, you can also use the group-manager profile. Set the childProfile parameter to cmaf-cloudstorage and the group.streamMatcher parameter to nameSingle.
Adaptive bitrate streams
Use these steps to send a group of transcoded live stream renditions to an Oracle destination for distribution. This requires that the Transcoder is enabled in your live application.
- Locate and edit the PushPublishMap.txt file. The default map file location is [install-dir]/conf/[application]/PushPublishMap.txt. The map file is automatically created for you in this location when you enable the stream targets feature.
- Add a new entry to the PushPublishMap.txt, setting the parameters in the following table. For more, see About map profiles.
| Name | Description |
|---|---|
| entryName (required) | A descriptive name for the map entry and stream target that's used in logging. The entry name must be unique for every map entry in PushPublishMap.txt. |
| profile (required) | Defines how the stream is sent to its destination and determines which additional configurable parameters are available. Set to group-manager. For more, see the group-manager profile parameters. |
| childProfile (required) | Defines how streams in the group are sent to a destination and determines which additional configurable parameters are available. Set to cmaf-cloudstorage. |
| group.name (optional) | A descriptive name for the stream group for this stream target. Used to identify the group in playback URLs. If included, the value serves as the folder name for your assets in the Oracle bucket. Otherwise, the name of the map entry object is used for the folder name. |
| group.streamMatcher (required) | Determines the method of identifying streams to group for delivery to the destination and identifies the source streams as [source-stream-name]in the map file entry. For more, see group.streamMatcher. |
| cloudstorage.provider (required) | Defines the intended cloud storage provider for the stream destination. Set to Oracle. |
| cloudstorage.bucketName (required) | Set to the name of your Oracle bucket. |
| cloudstorage.region (required) | Set to the bucket region provided by Oracle. |
| cloudstorage.accessID (required) | Set to the Access Key ID provided by Oracle. |
| cloudstorage.secretAccessKey (required) | Set to the Secret Access Key provided by Oracle. |
| cloudstorage.namespace (required) | Set to the Object Storage namespace for the top-level container for all Oracle buckets and objects. This is needed for the playback URL. |
| http.relativePlaylists (optional) | Set to true to use only relative URL references in the playlists and manifests sent to the destination. The default is false. |
Your PushPublishMap.txt file should look like the following sample:
myStream_oracle_cmaf_abr={"entryName": "oracle-cmaf-myStream-abr", "profile": "group-manager", "childProfile": "cmaf-cloudstorage", "group.name": "myStream-oracle-cmaf-abr.smil", "group.streamMatcher": "namePrefix", "cloudstorage.provider": "Oracle", "cloudstorage.bucketName": "[oracle-bucket-name]", "cloudstorage.region": "[oracle-region]", "cloudstorage.accessID": "[oracle-access-id]", "cloudstorage.secretAccessKey": "[oracle-secret-access-key]", "cloudstorage.namespace": "[oracle-bucket-namespace]", "http.relativePlaylists": "false"}
- Start your myStream_oracle_cmaf_abr stream and send it to your Wowza Streaming Engine server. For more about publishing live streams, see Connect a live source to Wowza Streaming Engine.
- Go to your Oracle Cloud account and refresh the Oracle bucket. Using the sample entry from Step 2, you should see the following folder structure:
  |-- myStream-oracle-cmaf-abr.smil → (top-level folder when group.name is included)
      |-- myStream_oracle_cmaf_abr_160p → (folder)
      |-- myStream_oracle_cmaf_abr_360p → (folder)
      |-- myStream_oracle_cmaf_abr_source → (folder)
      |-- playlist.m3u8
This publishes a stream in your Oracle bucket named myStream-oracle-cmaf-abr.smil based on the optional group.name parameter. Without the group.name specified, the name of the map entry object from the PushPublishMap.txt file is used for the folder name instead:
  |-- myStream_oracle_cmaf_abr → (top-level folder when group.name is excluded)
      |-- myStream_oracle_cmaf_abr_160p → (folder)
      |-- myStream_oracle_cmaf_abr_360p → (folder)
      |-- myStream_oracle_cmaf_abr_source → (folder)
      |-- playlist.m3u8
- The URL path to play back the file from the Oracle bucket takes this format if the group.name is included:
https://objectstorage.[region].oraclecloud.com/n/[namespace]/b/[bucket-name]/o/myStream-oracle-cmaf-abr.smil/playlist.m3u8
https://objectstorage.[region].oraclecloud.com/n/[namespace]/b/[bucket-name]/o/[group-name]/playlist.m3u8
Without the group.name, the URL path changes to include the name of the map entry object in the PushPublishMap.txt file:
https://objectstorage.[region].oraclecloud.com/n/[namespace]/b/[bucket-name]/o/myStream_oracle_cmaf_abr/playlist.m3u8
https://objectstorage.[region].oraclecloud.com/n/[namespace]/b/[bucket-name]/o/[map-entry-object-name]/playlist.m3u8
Send a CMAF HLS stream to an AWS S3 bucket
Once you have created your AWS S3 bucket and recorded your credentials, add a new map entry to the PushPublishMap.txt file. Depending on your scenario, toggle between the Single stream and Adaptive bitrate stream tabs for instructions.
Single bitrate streams
Use these steps to send a single rendition of your CMAF HLS stream to an AWS S3 bucket for distribution. This doesn't require the Transcoder to be enabled in your live application.
- Locate and edit the PushPublishMap.txt file. The default map file location is [install-dir]/conf/[application]/PushPublishMap.txt. The map file is automatically created for you in this location when you enable the stream targets feature.
- Add a new entry to the PushPublishMap.txt, setting the parameters in the following table. For more, see About map profiles.
| Name | Description |
|---|---|
|
entryName (required) |
A descriptive name for the map entry and stream target that's used in logging. The entry name must be unique for every map entry in PushPublishMap.txt. |
| streamName (required) | A descriptive name for the destination stream. It's sufficient to set this to the same value as the map entry. The value serves as the folder name for your assets in the AWS bucket. |
| profile (required) | Defines how the stream is sent to its destination and determines which additional configurable parameters are available. Set to cmaf-cloudstorage. |
| cloudstorage.provider (required) | Defines the intended cloud storage provider for the stream destination. Set to S3. |
| cloudstorage.bucketName (required) | Set to the name of your AWS S3 bucket. |
| cloudstorage.region (required) | Set to the bucket region provided by AWS. |
| cloudstorage.accessID (required) | Set to the Access Key ID provided by AWS. |
| cloudstorage.secretAccessKey (required) | Set to the Secret Access Key provided by AWS. |
| debugLog (optional) | Set to true to enable stream-level debugging. For more, see Stream-level debug. |
| adaptiveGroup (optional) | The name of the adaptive group to which this stream target belongs. This creates a top-level folder in the bucket with the adaptiveGroup name. Inside the top-level folder, you can find the playlist and a separate folder with the chunklist and segments. |
Your PushPublishMap.txt file should look like the following sample:
myStream_aws_cmaf_720p={"entryName": "aws-cmaf-myStream-720p", "streamName": "myStreamCMAF720p", "profile": "cmaf-cloudstorage", "cloudstorage.provider": "S3", "cloudstorage.bucketName": "[aws-bucket-name]", "cloudstorage.region": "[aws-region]", "cloudstorage.accessID": "[aws-access-id]", "cloudstorage.secretAccessKey": "[aws-secret-access-key]", "debugLog": true, "adaptiveGroup":"aws-cmaf-group"}
- Start your myStream_aws_cmaf_720p stream and send it to your Wowza Streaming Engine server. For more about publishing live streams, see Connect a live source to Wowza Streaming Engine.
- Go to your AWS account and refresh the S3 bucket. Using the sample entry from Step 2, you should see the following folder structure:
  |-- aws-cmaf-group → (top-level folder if adaptiveGroup included)
      |-- myStreamCMAF720p → (folder based on streamName with chunk lists for audio and video)
    	  |-- 8h04wu34 → (folder with header and media files)
              |-- header_m3u8.cmfa
              |-- header_m3u8.cmfv
              |-- media_44_m3u8.cmfa
              |-- media_44_m3u8.cmfv
              |-- media_45_m3u8.cmfa
          |-- chunklist_ao.m3u8
          |-- chunklist_vo.m3u8
      |-- playlist.m3u8
This publishes a stream in your S3 bucket named myStreamCMAF720p, with a top-level folder based on the adaptiveGroup parameter when included. Without the adaptive group specified, this is the folder structure instead:
  |-- myStreamCMAF720p → (top-level folder if adaptiveGroup excluded)
      |-- 8h04wu34 → (folder with header and media files)
          |-- header_m3u8.cmfa
          |-- header_m3u8.cmfv
          |-- media_44_m3u8.cmfa
          |-- media_44_m3u8.cmfv
          |-- media_45_m3u8.cmfa
      |-- chunklist_ao.m3u8
      |-- chunklist_vo.m3u8
      |-- playlist.m3u8
- The URL path to play back the file from the AWS bucket takes this format if an adaptive group is included:
https://[bucket-name].s3.amazonaws.com/aws-cmaf-group/playlist.m3u8
https://[bucket-name].s3.amazonaws.com/[adaptive-group]/playlist.m3u8
Without the adaptive group, the URL path changes to include the streamName parameter instead:
https://[bucket-name].s3.amazonaws.com/myStreamCMAF720p/playlist.m3u8
https://[bucket-name].s3.amazonaws.com/[stream-name]/playlist.m3u8
Note: As an alternative for the single-bitrate workflow, you can also use the group-manager profile. Set the childProfile parameter to cmaf-cloudstorage and the group.streamMatcher parameter to nameSingle.
Adaptive bitrate streams
Use these steps to send a group of transcoded live stream renditions to an AWS S3 bucket for distribution. This requires that the Transcoder is enabled in your live application.
- Locate and edit the PushPublishMap.txt file. The default map file location is [install-dir]/conf/[application]/PushPublishMap.txt. The map file is automatically created for you in this location when you enable the stream targets feature.
- Add a new entry to the PushPublishMap.txt, setting the parameters in the following table. For more, see About map profiles.
| Name | Description |
|---|---|
| entryName (required) | A descriptive name for the map entry and stream target that's used in logging. The entry name must be unique for every map entry in PushPublishMap.txt. |
| profile (required) | Defines how the stream is sent to its destination and determines which additional configurable parameters are available. Set to group-manager. For more, see the group-manager profile parameters. |
| childProfile (required) | Defines how streams in the group are sent to a destination and determines which additional configurable parameters are available. Set to cmaf-cloudstorage. |
| group.name (optional) | A descriptive name for the stream group for this stream target. Used to identify the group in playback URLs. If included, the value serves as the folder name for your assets in the AWS bucket. Otherwise, the name of the map entry object is used for the folder name. |
| group.streamMatcher (required) | Determines the method of identifying streams to group for delivery to the destination and identifies the source streams as [source-stream-name]in the map file entry. For more, see group.streamMatcher. |
| cloudstorage.provider (required) | Defines the intended cloud storage provider for the stream destination. Set to S3. |
| cloudstorage.bucketName (required) | Set to the name of your AWS S3 bucket. |
| cloudstorage.region (required) | Set to the bucket region provided by AWS. |
| cloudstorage.accessID (required) | Set to the Access Key ID provided by Oracle. |
| cloudstorage.secretAccessKey (required) | Set to the Secret Access Key provided by Oracle. |
| debugLog (optional) | Set to true to enable stream-level debugging. For more, see Stream-level debug. |
Your PushPublishMap.txt file should look like the following sample:
myStream_aws_cmaf_abr={"entryName": "aws-cmaf-myStream-abr", "profile": "group-manager", "childProfile": "cmaf-cloudstorage", "group.name": "myStream-aws-cmaf-abr.smil", "group.streamMatcher": "namePrefix", "cloudstorage.provider": "S3", "cloudstorage.bucketName": "[aws-bucket-name]", "cloudstorage.region": "[aws-region]", "cloudstorage.accessID": "[aws-access-id]", "cloudstorage.secretAccessKey": "[aws-secret-access-key]", "debugLog": true}
- Start your myStream_aws_cmaf_abr stream and send it to your Wowza Streaming Engine server. For more about publishing live streams, see Connect a live source to Wowza Streaming Engine.
- Go to your AWS account and refresh the S3 bucket. Using the sample entry from Step 2, you should see the following folder structure:
  |-- myStream-aws-cmaf-abr.smil → (top-level folder when group.name is included)
      |-- myStream_aws_cmaf_abr_160p → (folder)
      |-- myStream_aws_cmaf_abr_360p → (folder)
      |-- myStream_aws_cmaf_abr_source → (folder)
      |-- playlist.m3u8
This publishes a stream in your AWS bucket named myStream-aws-cmaf-abr.smil based on the optional group.name parameter. Without the group.name specified, the name of the map entry object from the PushPublishMap.txt file is used for the folder name instead:
  |-- myStream_aws_cmaf_abr → (top-level folder when group.name is included)
      |-- myStream_aws_cmaf_abr_160p → (folder)
      |-- myStream_aws_cmaf_abr_360p → (folder)
      |-- myStream_aws_cmaf_abr_source → (folder)
      |-- playlist.m3u8
- The URL path to play back the file from the S3 bucket takes this format if the group.name is included:
https://[bucket-name].s3.amazonaws.com/myStream-aws-cmaf-abr.smil/playlist.m3u8
https://[bucket-name].s3.amazonaws.com/[group-name]/playlist.m3u8
Without the group.name, the URL path changes to include the name of the map entry object in the PushPublishMap.txt file:
https://[bucket-name].s3.amazonaws.com/myStream_aws_cmaf_abr/playlist.m3u8
https://[bucket-name].s3.amazonaws.com/[map-entry-object-name]/playlist.m3u8
Troubleshoot stream playback from Engine
Sending stream targets to your cloud providers can incur storage costs. Similarly, if you send your stream targets to Wowza Video, it could count towards your CDN bandwidth, data, and usage.
As a troubleshooting step, you may want to ensure Wowza Streaming Engine is configured correctly before pushing your stream targets to those destinations and incurring additional costs. To confirm and preview your CMAF playback from Wowza Streaming Engine, see how to test your stream playback section.
More resources
- About CMAF workflows in Wowza Streaming Engine
- Stream using CMAF with Wowza Streaming Engine
- Scaling Wowza Streaming Engine with Wowza CDN
- Push streams to Wowza CDN from Wowza Streaming Engine
- Configure CMAF live streaming packetization in Wowza Streaming Engine
- Editing the push publishing map file
- About map profiles
- About stream targets


