Learn how to use a Wowza stream source with a live stream or transcoder in Wowza Video™ to automatically detect broadcast location, automatically start a stream when the video source starts, and automatically stop a stream after the video source disconnects.
For information about stream sources and their benefits see About Stream Sources.
To learn about other live stream or transcoder settings you might see in the user interface, see Live Stream Setup page in Wowza Video or Transcoder Setup page in Wowza Video.
Live stream workflow
1. Associate a Wowza stream source with a live stream
If you prefer the live stream workflow, which automatically creates output renditions and a stream target for you, create a live stream that receives your encoded video as a stream source.
- Sign in to Wowza Video.
- Click Add Live Stream.
- On the Live Stream Setup page, give your stream a name, and then click Next.
- To test the stream source automatically determining your Broadcast Location, we recommend you set this to a location on another continent. For example: set the location to Asia if you are primarily streaming from North America. Wowza Video will override the selected value and use a DNS query to automatically detect the closest ingest location.
Note: If you are not testing geographically dispersed streams, you can leave Broadcast Location set to the default value.
- On the Video Source and Transcoder Settings page, choose Other RTMP as the encoder you're using as your video source.
Note: Wowza stream sources are compatible with video sources using the RTMP source protocol only.
- Specify the delivery method for your source video: Select Push Stream and then select Push to a stream source.

- Specify the aspect ratio of the encoded video you're sending to Wowza Video as well as the other video source and transcoder setup options.
- Complete the steps to create the live stream: Specify Playback Settings and Hosted Page Settings, and then review your choices and click Finish.
Transcoder workflow
1. Associate a Wowza stream source with a transcoder
If you prefer the transcoder workflow, which is more modular, you can create a transcoder at the same time as you associate it with a Wowza stream source. First add the stream source and then configure a transcoder to use it.
Add a Wowza stream source
- Under Advanced on the left navigation bar, click Stream Sources, and then click Add Source.
- Enter a Stream Source Name, and then click Add.
Note: Wowza stream sources don't support source authentication.
Wowza Video creates the stream source. Next, create a transcoder and associate it with the stream source.
Add a transcoder
- Under Advanced on the left navigation bar, click Transcoders, and then click Add Transcoder.
- On the Transcoder Setup page, give your transcoder a name and specify the transcoder type and billing mode.
- To test the stream source automatically determining your Broadcast Location, we recommend you set this to a location on another continent. For example: set the location to Asia if you are primarily streaming from North America. Wowza Video will override the selected value and use a DNS query to automatically detect the closest ingest location.
Note: If you are not testing geographically dispersed stream, you can leave Broadcast Location set to the default value.
- Select a source protocol. For ingest to a stream source, select RTMP.
- For the source delivery method, choose Push to an existing stream source and then select the Wowza stream source you created.
- Specify the remaining setup options and then click Add. Wowza Video creates the transcoder and displays the Outputs & Targets tab of the transcoder detail page.
- Complete the transcoder by creating at least one output rendition and one target for it. For instructions see Create a custom transcoder with many outputs and targets in Wowza Video.
2. Test your connection
- Set up your video source using connection details from the live stream or transcoder's detail page.
- Start your video source.
Wowza Video receives the stream from the source, starts transcoding, creates output renditions for the stream, and sends each output rendition to the stream target assigned to it. - In the Wowza Video web manager, confirm that the live stream is playing by looking at the Video Preview in the Overview tab of the Live Stream Details or Transcoder Details page.
The video preview displays a frame from the live stream every 5 seconds. The started date and time appear under the preview. Source stream, transcoder, and delivery metrics begin to update.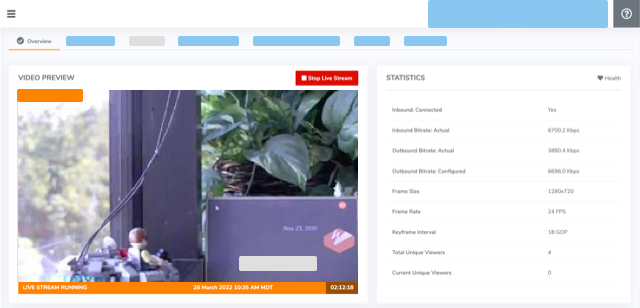
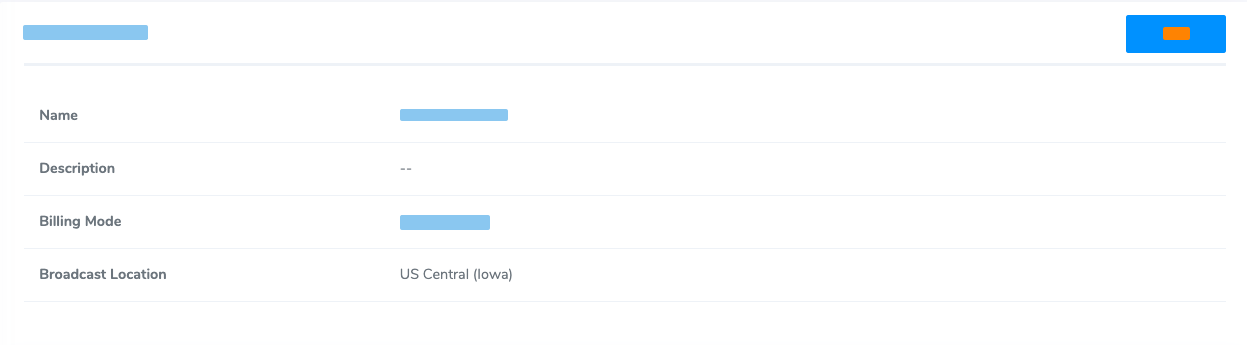
- In order to check that your current broadcast location was correctly identified, check the Broadcast Location on the Live Stream Setup tab of the Live Stream Details page or the Transcoder Setup tab of the Transcoder Details page.
The detected video source location is shown as the Broadcast Location. In this example: US Central (Iowa).
- To end your test stream, stop the video source.
Once you disable the video source, the transcoder continues to run and accrue charges until it reaches the default idle timeout value of 20 minutes. The transcoder then stops automatically. You can edit the Idle Timeout value on the Transcoder Setup tab of the transcoder details page so that the transcoder stops sooner.
Alternatively, you can stop the transcoder manually by clicking Stop Transcoder at the top of the transcoder detail page. To stop the live stream manually, click Stop Live Stream at the top of the live stream detail page.


