Wowza Streaming Engine™ (WSE) stream targets allow you to distribute live streams to multiple destinations. For example, you can send a live stream from one WSE server to a second WSE server. This gives you flexibility in expanding and scaling your WSE implementation, computing resources, and delivery options.
This article explains how to configure two WSE servers so that you can send a live stream from one to the other over RTMP. To do so, you create a live application in each server instance, and send the stream from the first instance to the second by using the stream targets feature.If you're using transcoder for adaptive bitrate streaming, you can enable it on the first WSE server and send the adaptive bitrate renditions to a target application on a second WSE server by creating a stream target for each rendition.
You can also transcode on the target application. Your first WSE server can ingest one high bitrate stream and send it to the target application for which transcoder enabled. This configuration is useful for distributing the transcoding workload and where uplink bandwidth to the source instance is limited.
Create a target app
Start by creating a live target application on the WSE instance that will deliver the live stream for final viewing.
- Open WSE Manager.
- Click the Applications tab.
- Click Add Application.
- On the Add Application page, select the Live application type.
- In the New Application dialog box, enter a name for the application, such as liveTarget, and then click Add.
- Click Save.
Create a source app
Next, create a live application that will ingest the live stream from an H.264 live encoder or camera. This live application on the source WSE instance will send the stream to the liveTarget application on the target Wowza Streaming Engine instance.
- Open WSE Manager.
- Click the Applications tab.
- Click Add Application.
- On the Add Application page, select the Live application type.
- In the New Application dialog box, enter a name for the application, such as liveSource, and then click Add.
- Click Save.
- In the application's contents panel, click Sources (Live).
- Select the camera or encoder that you want to use as your video source, and complete the steps to connect it to Wowza Streaming Engine. For more information, see Connect a live source to Wowza Streaming Engine.
Note: By default, Wowza Streaming Engine requires RTMP and RTSP sources to provide a user name and password to connect to a live application. For information on how to turn off authentication, see Managing live source authentication settings.
Create a stream target to send the stream to the target application
After the source application is created, configure it to send the stream to the target application. Give the liveSource application the details of your liveTarget application so WSE can send the stream there.
- In the contents panel, click Stream Targets and then click Add Stream Target.
- On the Add Stream Target page under Wowza Target Destinations, select Wowza Streaming Engine.
- On the Wowza Streaming Engine Configuration page, provide the following information:
- Stream Target Name - A descriptive name for this target setup in Wowza Streaming Engine. The name must be unique and can't contain less-than (<), greater-than (>), colon ( : ), quotation (' and "), forward slash (/), backslash (), pipe (|), question mark (?), asterisk (*), double-dot (..), or tilde (~) characters.
- Source Stream Name - The name of the incoming stream that you specified in Wowza Streaming Engine when you set up the video source.
- Destination Application Name - The name of the application in the second Wowza Streaming Engine instance. In this article, it's liveTarget.
- Destination Application Instance - The name of the application instance in the second Wowza Streaming Engine instance. Leave blank to send the stream to the default application instance (_definst_).
- Destination Host - The hostname or IP address of the second Wowza Streaming Engine instance. You can find this information the Connection Settings panel on the Wowza Streaming Engine Manager Home page.
- Destination Port - The port number for your connection. RTMP connections use port 1935 by default.
- Destination Stream Name - The name of the stream that the stream target sends to the destination. Some destinations require you to use a specific stream name. If your destination requires a specific name, enter it in this field.
- User Name and Password - The user name and password required to connect to the liveTarget application.
Note: By default, WSE live encoders require a username and password to connect to a live application. The liveSource application is acting as an H.264 live encoder in this workflow, so the liveTarget application authenticates the liveSource application by default. For information on how to turn off authentication in the liveTarget application, see Managing live source authentication settings.
- Stream Target Name - A descriptive name for this target setup in Wowza Streaming Engine. The name must be unique and can't contain less-than (<), greater-than (>), colon ( : ), quotation (' and "), forward slash (/), backslash (), pipe (|), question mark (?), asterisk (*), double-dot (..), or tilde (~) characters.
- Click Add this target.
Then, for each stream target you create, set the stream target Adaptive Streaming property to true. To do this:
- On the Stream Targets page, click the Edit icon for the stream target.
- On the Advanced tab, click Edit. Access to the Advanced tab is limited to administrators with advanced permissions. For more information, see Manage credentials.
- Set Adaptive Streaming to true, and then click Save.
For details on configuring Transcoder, see Set up and run Transcoder in Wowza Streaming Engine.
Enable Stream Targets
Before streaming, WSE stream targets must be enabled.
- In the contents panel of your application, if you don't see a checkmark next to Stream Targets, click Stream Targets in the contents panel and then click Enable Stream Targets.
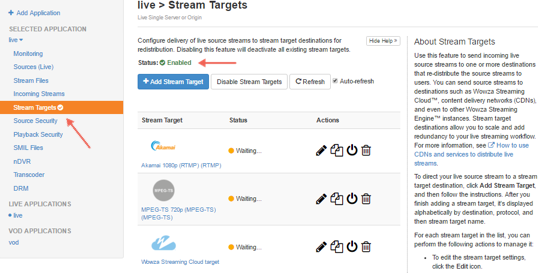
When Stream Targets is enabled, a checkmark appears next to Stream Targets in the contents panel and the Stream Targets page shows Status is Enabled.
- If the Status of an individual stream target is Disabled, click the Enable icon for the stream in the Actions column.
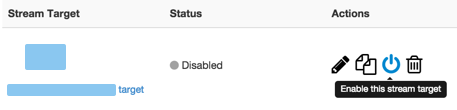
- When prompted, click Restart Now so your change takes effect.


When a stream target is enabled, its status on the Stream Targets page is one of the following:
- Waiting. The target is enabled but is not yet pushing the stream to the target Wowza Streaming Engine destination because either the target's configured source stream isn't connected to the source Wowza Streaming Engine input or the source Wowza Streaming Engine instance has not completed initializing the connection to the target Wowza Streaming Engine instance.
- Active. The source Wowza Streaming Engine instance successfully connected to the target Wowza Streaming Engine destination and is actively pushing the stream.
- Error. The source Wowza Streaming Engine instance unsuccessfully tried to connect to the target Wowza Streaming Engine destination. Make sure the target's configured source stream is connected to the Wowza Streaming Engine input. Errors might be due to an invalid target configuration or issue with the destination server.
Test the connection
Configure your encoder and then test the live stream.
- Start the stream in the H.264 camera or encoder that's publishing to the liveSource application in your first instance of Wowza Streaming Engine.
The liveSource application ingests the stream and sends it to the liveTarget application on your second Wowza Streaming Engine instance.
- In both the liveSource application and the liveTarget application, verify that the stream is working by clicking Incoming Streams in the contents panel in Wowza Streaming Engine Manager, and then clicking the stream name.
The stream details page displays the Status of the stream (Active) as well as details about connections, uptime, and throughput for the live stream.
- Click Stop Stream at the top of the live stream detail page to end your test stream, and then stop the stream in the source camera or encoder.


