Learn how to create and manage streaming apps and perform basic administrative functions using the browser-based manager in Wowza Streaming Engine™ media server software.
Video tutorial: Get started as a Wowza Streaming Engine Manager administrator
About Wowza Streaming Engine Manager
Wowza Streaming Engine Manager (WSE Manager) allows you to easily set up, manage, monitor, and measure streams using a web browser on your computer, tablet, or phone. WSE Maanger give publishers with a wide range of technical abilities control and confidence to stream video.
Most features can be configured in WSE Manager, but some can only be configured by directly editing the server's configuration files. (Directories that contain scripts or executable files require system-level admin or root privileges to edit.)
Manage credentials
The first time you start WSE Manager, you will be prompted to enter the username and password you created during installation. This account has admin access, but is not an advanced admin. (It does not have access to the advanced server and app settings. After signing in, you should enable access to the advanced settings. You may also create new user accounts.
Advanced admin account
In order to access the advances admin properties found in WSE Manager's Properties, Modules, or Server Listeners tabs, you must be logged in as an admin with advanced permissions. Follow the steps below to add advanced admin permissions to an existing user.
- Open WSE Manager.
- Click the Server tab.
- In the contents panel, click Users.
- Click the Edit icon for the admin account.
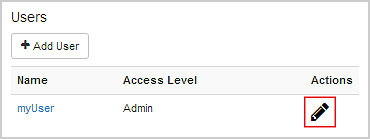
- Select the Allow access to advanced properties and features check box.
- Click Save.
- Sign in again after WSE Manager signs you out.
User account
WSE Manager accounts can have either admin or read-only permissions. Follow the steps below to create a new user for your WSE server.
Notes:
- We recommend encoding passwords using one of the methods supported by Wowza Streaming Engine (bcrypt or digest). For more information, see Manage users with the Wowza Streaming Engine CLI password tool
- WSE Manager doesn't support Single Sign-On (SSO) or Active Directory (AD) authentication.
- Open WSE Manager.
- Click the Server tab.
- In the contents panel, click Users.
- Click Add User.
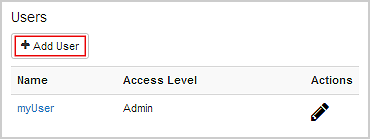
- Specify a User Name, Password, Access Level, and Preferences for the user.
- Select the appropriate Access Level.
- Allow access to advanced properties and settings: Allow Administrator users to edit advanced settings or allow Read-Only users the ability to view advanced settings.
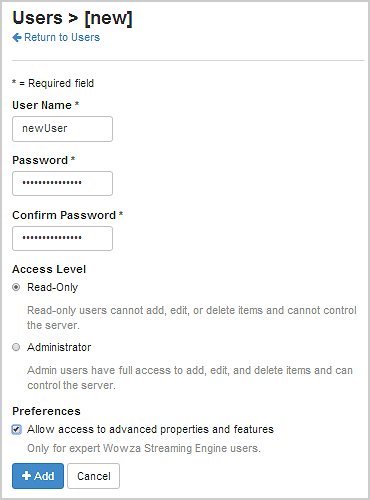
- Click Add.
Create an application
To begin using Wowza Streaming Engine, you must create an application.
Application types
Wowza Streaming Engine supports three types of live applications and three types of video on demand (VOD) applications.
- Live apps:
- Live Single server or origin - Live single-server applications deliver live streams directly to players. Live origin applications deliver streams to other servers running Wowza Streaming Engine, scaling delivery for a larger number of players.
- Live Edge - Live edge applications ingest live streams from an origin server that's running Wowza Streaming Engine and deliver the live streams to players.
- Live HTTP Origin - Live HTTP origin applications deliver live streams to an HTTP caching infrastructure using HTTP streaming protocols.
- Live Single server or origin - Live single-server applications deliver live streams directly to players. Live origin applications deliver streams to other servers running Wowza Streaming Engine, scaling delivery for a larger number of players.
- Video-on-demand apps:
- VOD Single server - VOD single-server applications stream video on demand files to players.
- VOD Edge - VOD edge applications ingest video on demand files from a Media Cache source and stream the VOD files to players.
- VOD HTTP Origin - VOD HTTP origin applications deliver video on demand files to an HTTP caching infrastructure using HTTP streaming protocols.
- VOD Single server - VOD single-server applications stream video on demand files to players.
Create a new app
To create a new application in WSE Manager, follow the steps below.
- Open WSE Manager.
- Click the Applications tab.
- Click Add Application.
- Select an application type. In this example, the VOD Single server application type is selected.
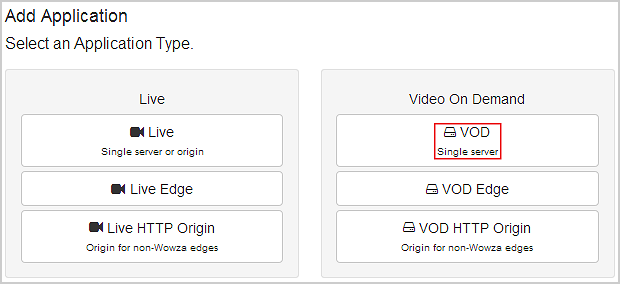
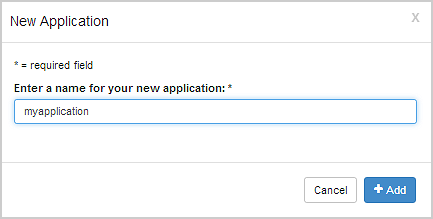
- In the New Application dialog box, enter a name.
- Click Add.
 .
.
- Click Save.
 .
.
Configure properties
Wowza Streaming Engine (WSE) properties provide a way to modify an app's default settings. They can be used by the server to pass data from applications to custom modules. In WSE Manager, you configure properties using the Properties tab of a feature or application detail page.
Access to the Properties tab requires advanced admin permissions.
Enable a built-in property
- In the contents panel, click the feature or application whose properties you want to configure.
- On the details page, click the Properties tab.
- In the Quick Links area, click a link to jump to the properties for that functionality.
- Click Edit.
- Click the property's Enabled check box.
- Specify the property's value.
-
- Restart the server or app.
Add a custom property
- In the contents panel, click the feature or application to which you want to add properties.
- Click the Properties tab.
- In the Quick Links bar, click Custom (or scroll to the Custom section).
- In the Custom properties section, click Edit and then click the Add Custom Property button.
- In the Add Custom Property dialog box, specify the property's Path, Name, Type, and Value.
- Click Add, click Save, and then restart the server or application.
For more information, see Add a custom property.
Configure modules
Modules are Java classes that load dynamically and provide additional functionality to an app. Wowza Streaming Engine (WSE) includes several built-in, optional server-side modules; for descriptions, see the Wowza Streaming Engine User's Guide. In addition, a downloadable package of additional utility modules, called the Module Collection, is available on the Wowza Support site. Finally, many AddOn packages use modules for their functionality.
You can see a list of an application's loaded modules on the Modules tab of the application page in Wowza Streaming Engine Manager. The modules load in the order they appear in the list—the module at the top of the list loads first; the module at the bottom of the list loads last. In general, new modules are added to the end of the list.
Access to the Modules tab requires advanced admin permissions.
You can use the Wowza IDE to develop custom modules and then add them to Wowza Streaming Engine.
Add a custom module to Wowza Streaming Engine
- Click the desired application in the contents panel.
- On the details page, click the Modules tab.
- Click Edit and then click the Add Module button.
- In the Add New Module dialog box, complete the required fields:
- Name - Should be unique.
- Description - Additional, useful information about the module. Not used in any operations.
- Fully Qualified Class Name - The path to the Java class that provides the module's functionality. The Java class that makes up a server-side module is most often bound to a .jar file in the Wowza Streaming Engine installation.
- Name - Should be unique.
- Click Add.
- Click Save
- Restart the app.
Server listeners
Server listeners are Java classes that provide notification of events that occur at the server level and extend functionality based on those events. Other event listeners can be invoked using API methods and are called when events occur that the listener is configured to listen for.
Server listener methods can be found in WSE Manager's Server Setup → Server Listeners tab. The methods are called in the order listed—starting with the method at the top of the list and ending with the method at the bottom of the list. The values specified by the final listener are always used.
Server listeners are specified using the Fully Qualified Class Name, which is the path to the Java class that provides the server listener's functionality.
Access to the Server Listeners tab requires advanced admin permissions.
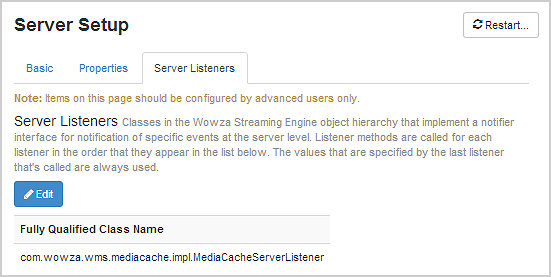
To add server listener to your server using WSE Manager, follow the steps below.
- Open WSE Manager.
- Click the Server tab.
- In the contents planel, click Server Setup.
- On the details page, click the Server Listeners tab.
- Click Edit.
- Click the Add Server Listener button.
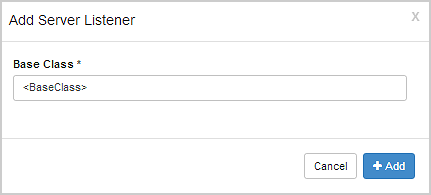
- In the Add Server Listener dialog box, specify the Base Class.
- Click Add.
- Click Save.
- Restart the server.
Configure ports
Wowza Streaming Engine uses the following default ports:
| Port | Description and usage |
| TCP 1935 | RTMP/RTMPE/RTMPT/RTSP-interleaved streaming and WOWZ™ streaming |
| TCP 8086-8088 | Administration |
| UDP 6970-9999 | RTP UDP streaming |
| TCP 80 | HLS, MPEG-DASH, and RTMPT streaming |
| TCP 443 | SSL/TLS streaming (RTMPS, HTTPS, and WebRTC) |
| TCP 554 | RTSP streaming |
Notes:
- WSE can't share ports. Make sure no other programs or services are running on these ports.
- Make sure the streaming ports are open on your firewall. (In many enterprise environments, this will require assistance from a network admin. In SOHO environments, you may have to configure "port forwarding" traffic of the port you're using to the port and IP address of your server. For more information, see your router or firewall documentation.)
If desired, you can configure additional ports for streaming in WSE Manager. To add a port, follow these steps.
- Open WSE Manager.
- Click the Server tab.
- In the contents panel, click Virtual Host Setup.
- Click Edit.
- Scroll down to the Host Ports section of the page.
- On the Default Streaming host port line, click the Edit icon.
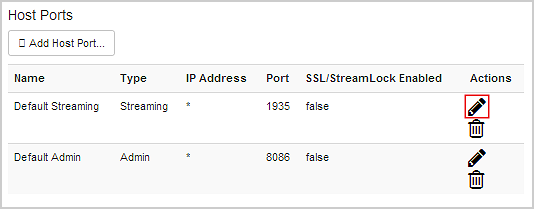
- Add the ports to the comma-delimited Port(s) list and click Apply.
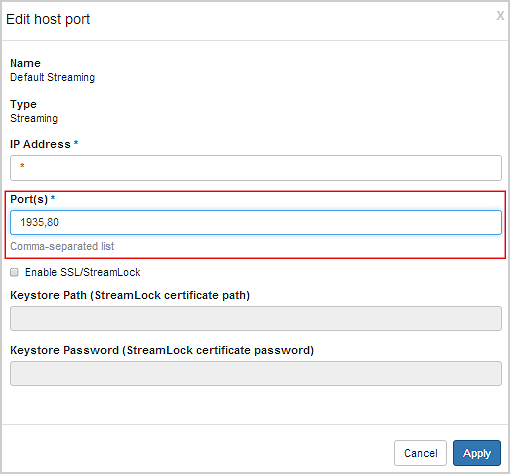
- Click Save and then restart the server.
License keys
The license key you enter when you run Setup to install an instance of Wowza Streaming Engine software is displayed in the License Keys box in WSE Manager. If you switch your licensing option, you can replace the existing license key with the new license key without reinstalling the software. If you purchased license keys to enable the integrated Transcoder, nDVR, and DRM technologies for use with the licensed server instance, you can add these license keys. All license key values are stored in the [install-dir]/conf/Server.license file in the Wowza Streaming Engine installation.
To add a license key in WSE Manager, do the following:
- Open WSE Manager.
- Click the Server tab
- In the contents panel, click Server Setup.
- Click Edit.
- In the License Keys box, enter your license key.
- (Optional) To enter multiple license keys, enter each license key on a separate line.
- Click Save.
- When prompted, click Restart Now. The new license(s) takes effect after the server is restarted.
Note: WSE Manager masks all but the first and last five digits of license keys to help protect this information.
Subscription and Perpetual licenses
Subscription and perpetual licenses for Wowza Streaming Engine (WSE) allow for unlimited connections to the server instance and enable use of the transcoder, nDVR, and DRM technologies that are integrated with each licensed instance.
A subscription license is best for variable demand. You can install as many server instances as needed using the same license key and enable the transcoder, nDVR, and DRM technologies integrated with each instance. A subscription license key has an ENGM4 prefix.
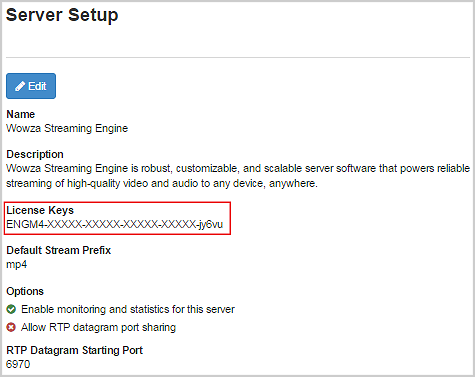
For Subscription pricing information, see Wowza Streaming Engine Pricing.
A perpetual license is best for stable, long-term demand. Perpetual license keys have an EPBP4 prefix and can be used with one server instance and the integrated transcoder, nDVR, and DRM technologies.
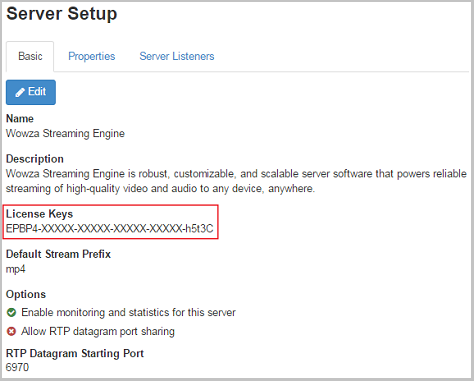
Notes:
- Perpetual license keys purchased prior to December 23, 2015 have an EPBU4 prefix. They license WSE and the transcoder and nDVR technologies. A separate license key is provided to enable the Wowza DRM technology integrated with the server instance (you don't have to enter the DRM license key in the License Keys box unless you want to enable this technology in the media server software).
- If you purchased a license for Wowza Streaming Engine before January 1, 2015, contact our sales team to learn how to license the software.
Trial licenses
After your Trial license for the WSE software expires and you acquire a new, paid license for the software, you must delete the Trial license key from the License Keys box and then add the new, paid key. If you're not sure if a license key is a Trial key, you can find it in the email that you received from Wowza when you downloaded the trial software.
Change the default log level
Wowza Streaming Engine (WSE) log files are written to [install-dir]/logs. The default logging level (INFO) enables monitoring and collects information to help troubleshoot most issues while adding minimal load to the server. When working with Wowza to troubleshoot an issue, you may be asked to temporarily turn on debug logging (increase the amount of information written to the logs). To do this in Wowza Streaming Engine 4.8.5 and earlier, open [install-dir]/conf/log4j.properties in a text editor and change the log level on the first line from INFO to DEBUG. To do this in Wowza Streaming Engine 4.8.8.01 and later, see Enable debug logging for Wowza Streaming Engine. Debug logging shouldn't be used in a production environment due to its increased load on the server.