Stream targets in Wowza Streaming Engine™ media server software allow you to send live streams to widely distributed destinations.
This article explains how to create a stream target with a push connection to distribute your live streams using Wowza CDN. You need an Amazon AWS account and a Wowza Video account for this workflow.
Alternatively, you may configure your connection for a pull-based workflow where the destination pulls the stream data from the server. To help you determine which CDN workflow best fits your streaming needs, see Scaling Wowza Streaming Engine with Wowza CDN.
We typically recommend the built-in push-based CDN workflow that includes distribution with Wowza Video. This method was introduced with Wowza Streaming Engine 4.8.23. For earlier versions of Wowza Streaming Engine, we recommend the following options to achieve the same push-based functionality:
- If running versions 4.8.18 to 4.8.22, you must download a separate plugin.
- For versions before 4.8.18, set up an S3 bucket in AWS as an origin to distribute your live streams, as described in this article.
Additionally, if you have more complex streaming scenarios, you may want to consider the pull-based workflow instead. Examples that may be a better fit for the pull-based approach include streams with multiple language or video tracks, WebVTT captions, or redundant stream workflows.
Video tutorial: Send Apple HLS content to Amazon S3 using a push-based Wowza Streaming Engine workflow
See how to configure your connection to Wowza CDN for a push-based workflow.
Before you start
Before you start, we recommend that you review and have access to the following items:
- A valid Wowza Streaming Engine license and a Wowza CDN subscription through Wowza Video. Contact our sales team for more information.
- An Amazon Web Service account with create, read, and write access to S3 storage using access key security credentials. See AWS Free Tier to create a free account.
- Create a live application in Wowza Streaming Engine Manager.
1. Create a bucket in AWS S3
See Creating a bucket for instructions on how to create a bucket in AWS. You must configure some settings to allow streams to be played back from your S3 bucket.
- For your S3 bucket, enable ACLs. For best results, the Object Ownership should be set to Object Writer.

- Enable Public Access for objects in the bucket.

- For testing direct playback from the bucket, you may need to enable cross-origin resource sharing (CORS). After the bucket is created, select the Permissions tab for the bucket and add the following CORS configuration.
Note: CORS is only required for direct playback from the bucket. It's not required for playback via the Wowza CDN stream target.
[
    {
        "AllowedHeaders": [],
        "AllowedMethods": [
            "GET"
        ],
        "AllowedOrigins": [
            "*"
        ],
        "ExposeHeaders": []
    }
]
- AWS bucket name: For example, my-s3-bucket.
- AWS bucket region: For example, us-west-1.
- AWS bucket URL: This is used with the Wowza CDN stream target in Wowza Video. The format for the AWS bucket URL is:
https://[bucket-name].s3.[region].amazonaws.com/ OR
https://my-s3-bucket.s3.us-west-1.amazonaws.com/
Note: For buckets in the us-east-1 region, AWS doesn't require the region in the URL (https://[bucket-name].s3.amazonasw.com/). This is a legacy format AWS URL. It won't work with Wowza CDN stream targets. Instead, you need to use the regionalised S3 URL for us-east-1, which is https://[bucket-name].s3.us-east-1.amazonaws.com.
- Record your IAM credentials. These are set per user in AWS. See Create an IAM admin and user group in AWS for more information. Record the following:
- AWS Access ID: For example, AKIAI6234VXXREN3KWJQ.
- AWS Secret Access Key: For example, y1PFFPOEwSrUfvvvdalA1qs9sFDM7+QzQTMHoqP7.
2. Enable the Wowza Streaming Engine stream target
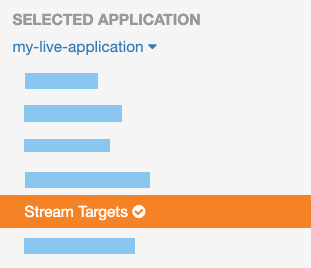
Before you push a stream, you must enable stream targets for your live Wowza Streaming Engine application.
- Go to the contents panel of your live application and click Stream Targets.
- On the Stream Targets page, click Enable Stream Targets.
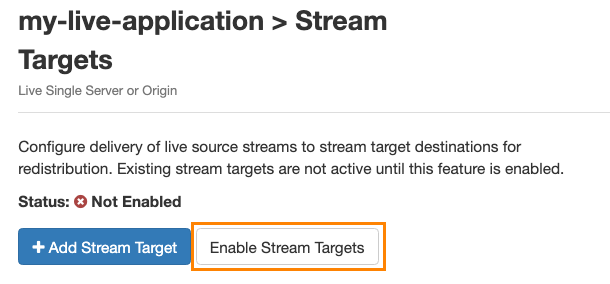
When stream targets are enabled, a checkmark appears next to the Stream Targets text in the contents panel. The Stream Targets page shows the status as Enabled.
- Restart the application for changes to take effect.
3. Create a Wowza Streaming Engine stream target
Once you've created your AWS S3 bucket and recorded your credentials, add a new map entry to the PushPublishMap.txt file. When you complete these steps, you add a Wowza Streaming Engine stream target to send your stream to AWS S3. The AWS S3 bucket is used as a storage location and works as an origin with Wowza Video. For more, see About map entries.
- Locate the PushPublishMap.txt file. The default map file location is [install-dir]/conf/[application]/PushPublishMap.txt. The map file is automatically created for you in this location when you enable the stream targets feature.
- Add a new entry to the PushPublishMap.txt.
Note: Each entry in the map file must be on a single line.
You can use the following sample code, making sure to:
- Set http.relativePlaylists to true. It's set to false by default.
- Set streamName to match the incoming stream name or transcoder rendition for each stream target.
- Set entryName to a unique name for your stream target.
- For adaptive bitrate entries, set profile to group-manager and group.name to a unique name for your stream target.
- Set cloudstorage.bucketName to your AWS bucket name.
- Set cloudstorage.region to your AWS bucket region.
- Set cloudstorage.accessID to your AWS access ID.
- Set cloudstorage.secretAccessKey to your AWS secret access key.
- Change any additional values to be unique to your stream target.
- Before saving the file, use a JSON validator to validate the map entries. Copy the complete text after the = sign into the validator to check the syntax.
Note: For more information about creating these map entries, see the Sample map entries section.
- Sign in to Wowza Streaming Engine.
- Click Server on the menu bar, and then click Restart. Your new chunklist and playlist will be loaded into your S3 bucket. This may take up to a minute.
- Copy the URL for the playlist from your S3 bucket, for example:
https://my-s3-bucket.s3-us-west-1.amazonaws.com/myStream/playlist.m3u8
Note: For buckets in the us-east-1 region, this URL will be the legacy format and needs to be changed to include the region.
- Test the playback using the URL for your playlist in your player.
Note: Some players will require CORS headers to be enabled for direct playback from the bucket.
Sample map entries
For more information on map entries, see Use CDNs and services to distribute live streams from Wowza Streaming Engine. The group-manager profile and child profiles can be used to publish HLS streams to cloud providers such as AWS.
Map entry: Single bitrate with video
This example entry can be used to send a single HLS stream from Wowza Streaming Engine to your AWS S3 bucket.
stream_name={"entryName": "wv_via_S3", "streamName": "stream_name", "profile": "cupertino-cloudstorage", "cloudstorage.provider": "S3", "cloudstorage.bucketName": "[s3-bucket-name]", "cloudstorage.region": "[aws-region]", "cloudstorage.accessID": "[aws-access-id]", "cloudstorage.secretAccessKey": "[aws-secret-access-key]", "debugLog": "false", "cloudstorage.transportDebug": "false", "http.relativePlaylists": "true"}
Map entry: single bitrate with single audio track only
This example entry can be used to send a single audio track from Wowza Streaming Engine to your AWS S3 bucket. With the cupertino.audiotagtype, you can add an Apple-compliant rendition from a specific source.
myStream={"entryName": "myStream_av_a", "streamName": "myStream_av_a", "adaptiveGroup": "myStream", "profile": "cupertino-cloudstorage", "cloudstorage.provider": "S3", "cloudstorage.bucketName": "[s3-bucket-name]", "cloudstorage.region": "[aws-region]", "cloudstorage.accessID": "[aws-access-id]", "cloudstorage.secretAccessKey": "[aws-secret-access-key]", "cupertino.renditions": "audioonly", "cupertino.audiotagtype": "stream-inf", "debugLog": "false", "cloudstorage.transportDebug": "false", "http.relativePlaylists": "true"}
Map entry: Single bitrate with multiple, alternative audio tracks
This example entry can be used to send a single HLS stream with multiple language tracks from Wowza Streaming Engine to your AWS S3 bucket for storage. Use the cupertino-cloudstorage profile in this scenario. For more, see cupertino-cloudstorage profile parameters.
The entry must include separate entries for each rendition you're sending. In this example, you have separate entries for a video-only track, an English audio-only track, and a Russian audio-only track. The English output is an Apple-compliant rendition, while the Russian output ias an alternative audio rendition. With a successful setup, you can select alternative audio language tracks for your player during playback. Replace any placeholder text with your own values.
myStream_video={"entryName": "myStream-s3-video", "streamName": "myStream_video", "adaptiveGroup": "myStream", "profile": "cupertino-cloudstorage", "cloudstorage.provider": "S3", "cloudstorage.bucketName": "[s3-bucket-name]", "cloudstorage.region": "[aws-region]", "cloudstorage.accessID": "[aws-access-id]", "cloudstorage.secretAccessKey": "[aws-secret-access-key]", "cupertino.renditions": "videoonly", "http.relativePlaylists": "true"}

myStream_ao_eng={"entryName": "myStream-s3-audio-eng", "streamName": "myStream_ao_eng", "adaptiveGroup": "myStream", "profile": "cupertino-cloudstorage", "cloudstorage.provider": "S3", "cloudstorage.bucketName": "[s3-bucket-name]", "cloudstorage.region": "[aws-region]", "cloudstorage.accessID": "[aws-access-id]", "cloudstorage.secretAccessKey": "[aws-secret-access-key]", "cupertino.renditions": "audioonly", "cupertino.audiotagtype": "stream_inf|media", "http.relativePlaylists": "true", "cupertino.language": "en"}

myStream_ao_rus={"entryName": "myStream-s3-audio-rus", "streamName": "myStream_ao_rus", "adaptiveGroup": "myStream", "profile": "cupertino-cloudstorage", "cloudstorage.provider": "S3", "cloudstorage.bucketName": "[s3-bucket-name]", "cloudstorage.region": "[aws-region]", "cloudstorage.accessID": "[aws-access-id]", "cloudstorage.secretAccessKey": "[aws-secret-access-key]", "cupertino.renditions": "audioonly", "http.relativePlaylists": "true", "cupertino.language": "ru"}
For each entry in this example, an asset is created for each streamName in the S3 bucket. The adaptiveGroup parameter groups all assets together into one stream during playback. The cupertino.renditions parameter is used to create separate audio and video tracks.
A master playlist generated from our sample entry looks like this:
#EXTM3U
#EXT-X-VERSION:3
#EXT-X-MEDIA:TYPE=AUDIO,GROUP-ID="audioGroup",NAME="English",LANGUAGE="en",URI="myStream_ao_eng/chunklist_ao.m3u8"
#EXT-X-MEDIA:TYPE=AUDIO,GROUP-ID="audioGroup",NAME="русский",LANGUAGE="ru",URI="myStream_ao_rus/chunklist_ao.m3u8"
#EXT-X-STREAM-INF:BANDWIDTH=959502,CODECS="avc1.42c01e,mp4a.40.2",RESOLUTION=656x274,AUDIO="audioGroup"
myStream_video/chunklist_vo.m3u8
#EXT-X-STREAM-INF:BANDWIDTH=112863,CODECS="mp4a.40.2",AUDIO="audioGroup"
myStream_ao_eng/chunklist_ao.m3u8
Map entry: Adaptive bitrate
This example entry can be used to send a group of transcoded live stream renditions from Wowza Streaming Engine to your AWS S3 bucket.
stream_name={"entryName":"wv_via_S3", "profile":"group-manager", "group.name":"stream_name_ABR", "cloudstorage.transportDebug":"false", "cloudstorage.secretAccessKey":"[aws-secret-access-key]", "http.relativePlaylists":"true", "cloudstorage.provider":"S3", "cloudstorage.region":"[aws-region]", "cloudstorage.accessID":"[aws-access-id]", "cloudstorage.bucketName":"[s3-bucket-name]", "childProfile":"cupertino-cloudstorage", "group.streamMatcher":"namePrefix"}
4. Create a Wowza CDN stream target in Wowza Video
After sending your content to your AWS S3 bucket, continue with these steps to use that storage location as an origin with Wowza Video. Setting up a Wowza CDN stream target allows you to manage traffic to your S3 bucket more efficiently while reducing costs when pulling content from that location.
Note: Only one Wowza CDN stream target needs to be created for each S3 bucket.
- Sign in to Wowza Video.
- Click Advanced > Stream targets in the sidebar navigation.
- On the Stream targets page, click the Add new button.
- Select Wowza CDN.
- On the Wowza CDN stream target setup page, enter a Target name.
- Confirm the delivery protocol.
- Select the Enable a custom origin checkbox.
- For the Region, add your AWS bucket region.
- In the Custom origin URL field, add your AWS bucket URL. For example:
https://[bucket-name].s3.[region].amazonaws.com/
- Click Save changes.
- Go to the Settings tab of the stream target details page. Note the playback path to append for the playback URL. It looks similar to this:
https://cdn3.wowza.com/5/QkxIcU9S-example/
5. Test playback
As the root for your playback URL, you can use the AWS S3 bucket URL or the playback path for the Wowza CDN stream target in Wowza Video. You can find this Wowza CDN stream target playback path on the stream target's Settings tab in Wowza Video. To test playback, append the path to the specific file inside the S3 bucket. For more, see the following examples.
Single bitrate with stream name in the URL
Wowza CDN URL: https://cdn3.wowza.com/5/QkxIcU9S-example/myStream/playlist.m3u8
AWS S3 URL: https://my-s3-bucket.s3.us-west-1.amazonaws.com/myStream/playlist.m3u8
Adaptive bitrate with group name in the URL
Wowza CDN URL: https://cdn3.wowza.com/5/QkxIcU9S-example/myStream-ABR/playlist.m3u8
AWS S3 URL: https://my-s3-bucket.s3.us-west-1.amazonaws.com/myStream-ABR/playlist.m3u8


