Learn how to send streams from the Wowza Video™ service for playback on Facebook Live.
To learn about other live stream or transcoder settings you might see in the user interface, see Live Stream Setup page in Wowza Video or Transcoder Setup page in Wowza Video.
Notes:
- A separate Facebook account with support for the Live Video publishing tool is required. All Facebook accounts (personal profiles and commercial Pages) are supported.
- Because of a direct integration between Wowza Video and Facebook Live, the configuration process does not require a server URL or stream key generated by Facebook.
Before you start
You should complete the following tasks:
- Decide between the live stream or transcoder workflow. Facebook can accept multiple output renditions from Wowza Video, but that can result in duplicate streams on Facebook.
- Live stream: Prepare a stream for Facebook by creating an adaptive bitrate live stream to send only the highest output rendition.
- Transcoder: Create a passthrough transcoder and send the transcoder's one passthrough rendition to Facebook. This option requires a subscription that supports passthrough streaming.
If you're not sure what type of subscription you have, check your account on the Wowza portal.
For information about 24x7 and passthrough streaming subscriptions, see Wowza Video 24x7 streaming plans.
Facebook has the following requirements for live streams:
- The maximum resolution is 720p (720 x 1280), at 30 frames per second.
- You must send a keyframe (I-frame) at least once every two seconds throughout the stream.
- The recommended maximum bitrate is 2500 Kbps.
- The live video can stream for up to 8 hours.
- Audio is required (AAC only).
Note: Facebook may change their live stream requirements at any time. For more information, see their Live API Best Practices.
1. Create a live stream
When you create a live stream, Wowza Video automatically creates multiple adaptive bitrate output renditions based on the aspect ratio and resolution of the source video. However, you're only going to need the highest bitrate output rendition, which is 1280 x 720 in this tutorial. That's what you'll send to Facebook.
- In Wowza Video, click Add Live Stream.
- On the Live Stream Setup page, enter a Live Stream Name, choose a Broadcast Location, and then click Next.
- If you have the option on the Video Source and Transcoder Settings page, specify the Live Stream Type as Adaptive bitrate (Recommended).
- Specify other video source settings, including an aspect ratio of 1280 x 720. Then click Next.
- Click Next two times to skip the Playback Settings and Hosted Page Settings pages. These options don't matter if you're delivering the stream to viewers on Facebook.
- On the Review page, click Finish to create the live stream. Wowza Video creates the live stream and displays the Overview tab of the live stream detail page.
- To prepare the live stream for Facebook, go to the stream's transcoder detail page. In the Advanced section of the main navigation menu, click Transcoders.
- Select your live stream on the Transcoders page. It appears as [Live stream name] / Transcoder.
- Click the Outputs & Targets tab of the transcoder detail page.
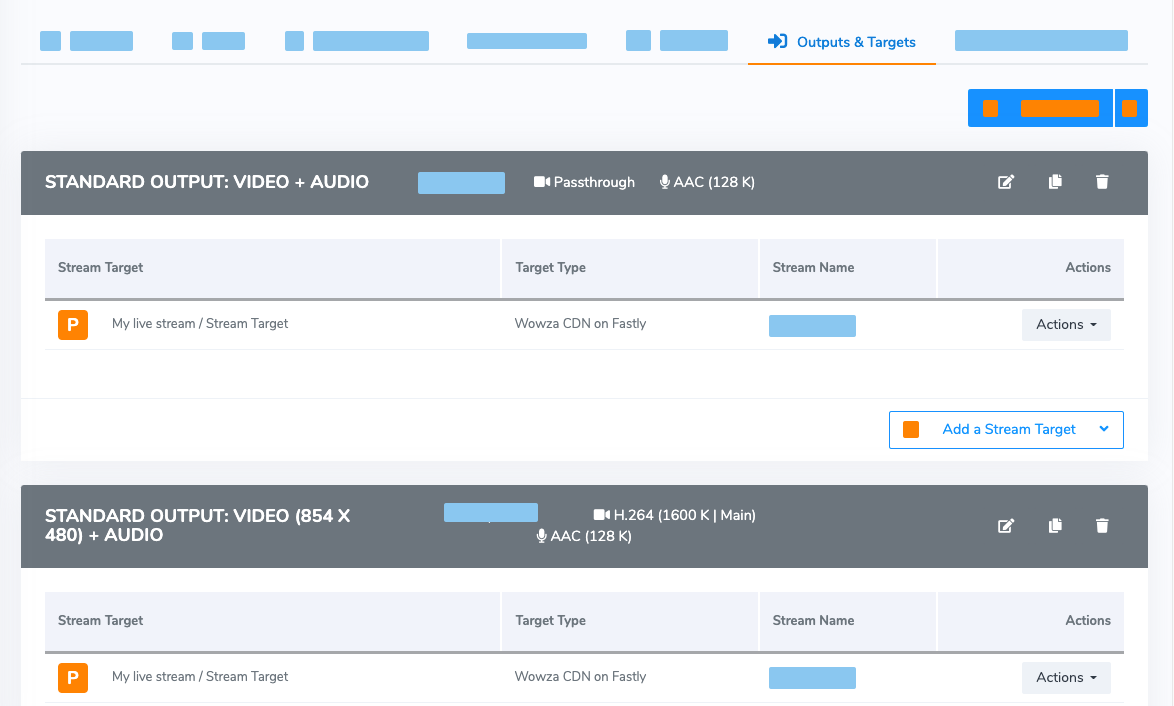

The Outputs & Targets tab displays the output renditions for your live stream. The first output on the list is the highest bitrate output rendition, the one you're going to send to Facebook.
- You won't use the other renditions, so delete them. Starting with the second output on the page, click the trash can icon. When prompted, click OK to confirm that you want to delete the output.
- Repeat Step 10 to delete the other adaptive bitrate output renditions until only the highest bitrate rendition remains.
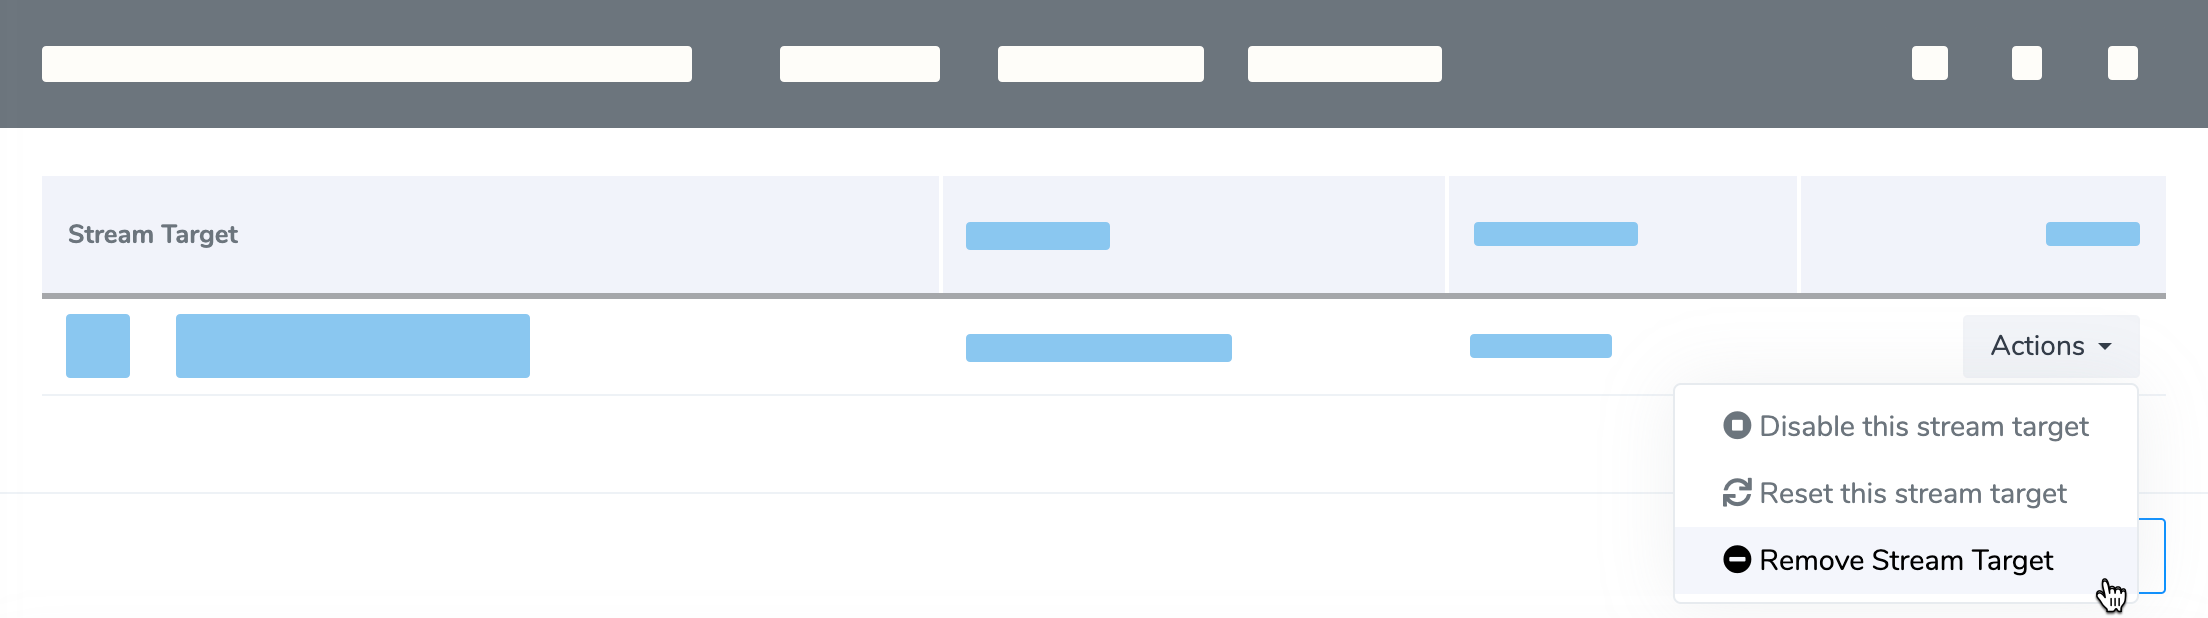
There's one more clean-up step. You're not using the stream target that Wowza Video automatically created for the highest bitrate output rendition, so delete it, too.
- Click the Actions button for the highest bitrate output's assigned target and then click Remove this stream target. When prompted, click OK to confirm that you want to delete the target.

Now you're ready to create the Facebook Live stream target for your live stream. For instructions, jump to Add the Facebook Live target.
1. Create a passthrough transcoder
- Under Advanced on the left navigation bar, click Transcoders. Then click Add Transcoder.
- On the Transcoder Setup page, enter a Transcoder Name.
- For Transcoder Type, choose Passthrough. Then, choose a Broadcast Location that's as close as possible to where your stream will originate.
- For Closed Captions, choose None. Facebook doesn't support CEA-608 or onTextData captions.
- Specify the other transcoder setup options.
- Click Add.
Wowza Video creates the transcoder and displays the Outputs & Targets tab of the transcoder detail page. A single passthrough output rendition is ready for the transcoder. You just need to create the Facebook Live stream target for it. For instructions, continue to Add the Facebook Live target.
2. Add the Facebook Live target
Next, create the Facebook Live stream target for the output rendition.
- On the Outputs & Targets tab of the transcoder detail page, for the output rendition, click Add a Stream Target and then choose Facebook Live.
- On the Create a Facebook Live stream target page, click the Continue with Facebook button.
- In the pop-up window, enter your Facebook account credentials and click Log In.
- On the Create a Facebook Live stream target page, enter a Target Name to identify the target in Wowza Video.
- If desired, enter a Title to appear with the stream on Facebook. The Title can be up to 255 characters. Emojis are not supported.
- If desired, enter a Description to appear with the stream on Facebook. Emojis are not supported in the Description.
- Select a Video Destination. The destination is where you want to post the live stream on Facebook.
- Timeline - Post to your Timeline.
- Page - Post to a Page that you manage. Select the Page from the pop-up menu.
- Event - Post to an event that you're hosting. Select the event from the pop-up menu.
- Group - Post to a group you belong to. Select the group from the pop-up menu.
Notes:
- The Video Destination can't be changed after the target is created.
- If you want to share on a Page, group, or event that doesn't appear in the menus, you may not have permission to post to it. Check your Facebook account and app settings
- To enable a member to stream to a group, the Facebook group admin must add the Wowza Video app. For more information, see the Facebook Help Center article How do I add or remove an app from a group I admin?
- If you're posting the stream to your Timeline, specify who can watch the live video on Facebook. For Privacy, choose Only me, Friends, Friends of Friends, or Public.
- Select Stream 360 if you want to deliver a stream captured by an H.264 360-degree camera that adds Facebook's 360 metadata to the video file.
- Click Add.
3. Test your setup
When your transcoder is complete, configure your source encoder or camera and test the entire setup.
- Select your transcoder.
- Click Start Transcoder at the top of the transcoder detail page.
- Click Start to confirm that you want to start the transcoder. Wowza Video starts the transcoder and connects with the source.
- Start your video source.
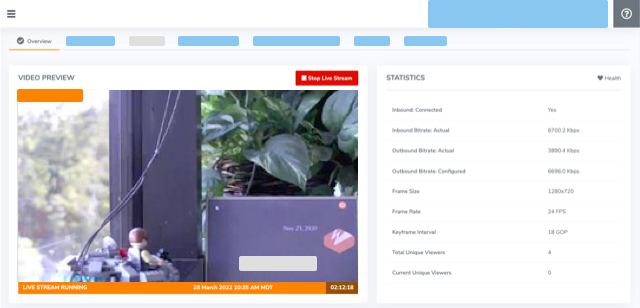
- In the Wowza Video web manager, confirm that the live stream is playing by looking at the Video Preview in the Overview tab of the Transcoder Details page.
The video preview displays a frame from the live stream every five seconds. The started date and time appear under the preview. Source stream, transcoder, and delivery metrics begin to update.
- Check playback on Facebook by viewing the stream on your Timeline, Page, group, or event.
Note: When logged in to Facebook, you may see Published with Wowza Video in the post. This label isn't visible to viewers; it's only visible to the account used to publish the stream. - Click Stop Transcoder at the top of the transcoder detail page to end your test stream, and then stop the video source.

Edit a Facebook Live stream target
Most Facebook Live stream targets expire 60 days from when you authorize your Facebook account to connect to the Facebook Live target. However, the target might become invalid sooner than that. If the target expires or you have trouble streaming to Facebook, renew the target by editing it.
- Click Advanced on the menu bar, click Stream Targets. Then select the Facebook Live stream target.
- Click Edit and change the Target Name, Title, Description, or Privacy setting.
- Click Save.
Troubleshoot a Facebook Live stream target
If your Facebook Live stream target fails due to a problem at Facebook, Wowza Video displays an error message from Facebook. Common causes for streams to fail are that you don't have the right permissions on the Timeline or other destination at Facebook, or you try to send a stream to Facebook that violates the company's community standards.
If Facebook blocks you from sending the stream from Wowza Video, visit the Facebook Help Center or see Facebook's Community Standards to troubleshoot the connection.
Facebook privacy settings
When you log in to Facebook for the first time from Wowza Video, Facebook displays the message, "Wowza Video would like to post to Facebook for you. Who should be able to see these posts?" This is the Business integrations visibility and post audience setting, which is the default privacy level for Wowza Video live streams you share on your Timeline and is the most public Privacy level you can use.
If you try to set the Privacy of an individual Facebook Live stream target to a level that's more public than the Business integrations visibility and post audience setting, the Business integrations visibility and post audience setting is used instead. To change the Business integrations visibility and post audience in Facebook, do the following:
- In the upper-right corner of your Facebook page, click the down arrow. Then click Settings.
- In the left panel, click Business Integrations. Under Active Business Integrations, click Wowza Video.
- Select the Business integrations visibility and post audience setting you prefer. Then click Save.


