
Learn how to use a JVC ProHD camcorder as the video source for a Wowza Video™ live stream. The JVC ProHD line of professional digital camcorders capture and stream high-definition live video.
To learn about other live stream settings you might see in the user interface, see Live Stream Setup page in Wowza Video.
Note: Wowza Video integrates with the following JVC ProHD digital camcorders:
- GY-HM650 (firmware version 4.0 or later)
- GY-HM850 (firmware version 2.0 or later)
- GY-HM890 (firmware version 2.0 or later)
- GY-HM200 (firmware version 1.0 or later)
- GY-LS300 (firmware version 1.0 or later)
1. Create a live stream
- Sign in to Wowza Video.
- Click Add Live Stream.
- On the Live Stream Setup page, enter a Live Stream Name, choose a Broadcast Location, and then click Next.
- On the Video Source Settings page, select JVC as the encoder you want to use to connect to Wowza Video.
- Specify the Input Resolution that you're using in your JVC camcorder.
- Click Next, and complete the steps to finish creating the live stream.
Wowza Video creates the live stream and displays the Overview tab of the live stream detail page. Make note of the Source Connection Information, including the Primary Server and the Stream Name, which you'll need to configure the JVC camcorder to push the stream to Wowza Video.
Note: RTMP authentication is disabled because the JVC ProHD camcorders don't support it.
2. Set up the JVC camcorder
- Sign in to the JVC camcorder's remote web-based admin tool.
Note: Menu names may vary depending on the JVC camcorder and firmware you're using.
- Choose Network/Settings > Live Streaming.
- For the Destination Server, specify the following:
- Type is RTMP.
- URL is the Primary Server from the Overview tab of the live stream detail page in Wowza Video.
- Stream Key is the Stream Name from the Overview tab of the live stream detail page in Wowza Video.
- Configure other required encoding settings for your broadcast. See the documentation for your JVC camcorder for details.
3. Test the connection
- In Wowza Video, select the live stream that uses the JVC camcorder as its video source.
- Click Start Live Stream at the top of the live stream detail page.
- Click Start to confirm that you want to start the stream.
Wowza Video opens the stream and connects with the camcorder.
- Start the JVC camcorder: Select Main Menu > System > Network/Settings > Live Streaming Set, and then set Live Streaming to On.
Note: If you start streaming from the camcorder before you set up the live stream in Wowza Video, the network connection icon in the camcorder's LCD monitor indicates that the connection hasn't been established. When you start the live stream in Wowza Video, it will periodically try to connect to the camcorder until the camcorder comes online.
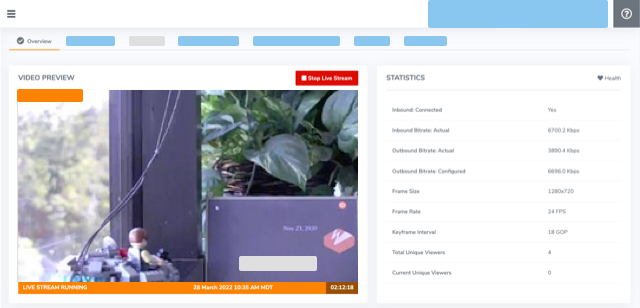
- In the Wowza Video web manager, confirm that the live stream is playing by looking at the Video Preview in the Overview tab of the Live Stream Details page.
The video preview displays a frame from the live stream every 5 seconds. The started date and time appear under the preview. Source stream, transcoder, and delivery metrics begin to update.

- Click Stop Live Stream at the top of the live stream detail page to end your test stream, and then stop the JVC camcorder.
Note: If you configure a camera or encoder to push video to the Wowza Video service, it may take up to 10 seconds once the live stream or transcoder has started for the encoder to connect. This is due to DNS lookup of the host server's IP address. For a more immediate connection, in the encoder settings, use the IP address that's visible in Wowza Video after the live stream or transcoder has started. See Speed up the connection to a transcoder in Wowza Video for more information.


