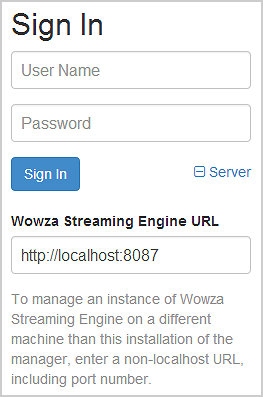
By default, Wowza Streaming Engine™ media server software accepts connections from Wowza Streaming Engine Manager on localhost. When you start Wowza Streaming Engine Manager on localhost, you can click the Server node on the Sign In page to see the default local host connection URL, which is http://localhost:8087.
If you need to connect to a remote (non-localhost) Wowza Streaming Engine from your local computer, you have two options. You can connect to a remote Wowza Streaming Engine Manager from a local web browser, or connect to a remote Wowza Streaming Engine server from a local Wowza Streaming Engine Manager.
Connect to remote Wowza Streaming Engine Manager from local web browser
- Make sure that the Wowza Streaming Engine and Wowza Streaming Engine Manager are started on the same remote server that you want to manage (see Start and stop Wowza Streaming Engine).
- In a browser on the local client computer, open Wowza Streaming Engine Manager on the remote server by entering the following URL:
http://[wowza-ip-address]:8088/enginemanager
where [wowza-ip-address] is the remote server IP address or hostname.
-
On the Sign In page, enter the user name and password for Wowza Streaming Engine on the remote server (for more information, see Manage credentials).
Do not modify the default Wowza Streaming Engine URL for the local host (http://localhost:8087).
- Click Sign In.

Connect to remote Streaming Engine from local Streaming Engine Manager
Note: This option requires that Wowza Streaming Engine is installed on the remote computer (the server that you want to manage) and Wowza Streaming Engine Manager is installed on the local computer (the computer that you're using to connect to the remote server).
To use your local installation of Wowza Streaming Engine Manager to manage remote (non-localhost) Wowza Streaming Engine installations, you must configure security settings on each remote server that you want to manage to allow access from the local manager. This process is called whitelisting.
On each remote Wowza Streaming Engine server:
- Make sure that Wowza Streaming Engine is stopped (see Start and stop Wowza Streaming Engine).
- Open the [install-dir]/conf/Server.xml file using a text editor and update the IPWhiteList property:
<RESTInterface>
    ...
    <IPWhiteList>[client-ip-address]</IPWhiteList>
    ...
</RESTInterface>
Where [client-ip-address] is the IP address of the non-localhost computer that has Wowza Streaming Engine Manager installed.
Notes:
- You can specify that multiple IP addresses be allowed to connect by entering them as a comma-separated list and/or by using the wildcard (*) character, for example, <IPWhitelist>*</IPWhitelist> or <IPWhitelist>192.168.*.*</IPWhitelist>.
- If the Wowza Streaming Engine server is not part of your LAN or it's on the public Internet, use the public/WAN IP of the browser/client network.
- You can specify that multiple IP addresses be allowed to connect by entering them as a comma-separated list and/or by using the wildcard (*) character, for example, <IPWhitelist>*</IPWhitelist> or <IPWhitelist>192.168.*.*</IPWhitelist>.
- Save the changes in the Server.xml file.
- If Wowza Streaming Engine was running when you made these changes, restart it so that the changes take effect.
- Make sure that Wowza Streaming Engine is started on the remote computer (see Start and stop Wowza Streaming Engine).
- On the local client computer, start Wowza Streaming Engine Manager (see Start and stop Wowza Streaming Engine).
- On the Sign In page, enter the use name and password configured for Wowza Streaming Engine on the remote computer (for more information, see Manage credentials).
-
Expand the Server node. Then in Wowza Streaming Engine URL, enter the remote Wowza Streaming Engine URL in the form http://[wowza-ip-address]:8087, where [wowza-ip-address] is the remote Wowza Streaming Engine computer's IP address or hostname.
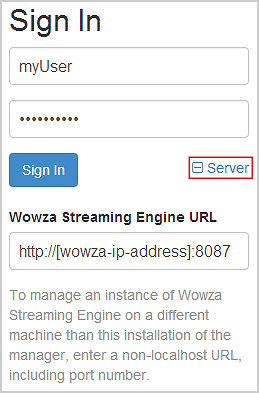
- Click Sign In.


