The Wowza Video™ service offers a multitude of playback options: a hosted page and player, playback over HLS and HDS URLs, and the capability to broadcast streams on social media sites like Facebook and YouTube. You can also use an external, third-party CDN to deliver streams to viewers.
You can send a live stream to an external CDN provider by using a custom stream target in Wowza Video. A custom stream target is a third-party endpoint that you connect to so that it can deliver your transcoded H.264 stream to viewers using its own edge network or resources.
To learn about other live stream settings you might see in the user interface, see Live Stream Setup page in Wowza Video.
1. Create the live stream
First, create the live stream.
- In Wowza Video, click Add Live Stream.
- Click the Live Streams menu, and then click Add Live Stream.
- On the Live Stream Setup page, enter a Live Stream Name, choose a Broadcast Location, and then click Next.
- On the Video Source and Transcoder Settings page, select the encoder or camera you want to use to connect to Wowza Video.
- Specify other video source settings, click Next, and complete the steps to finish creating the live stream.
- If you plan to also deliver your live stream using a Wowza Video hosted page, specify the options on the Playback Settings page, selecting Yes for creating a hosted page. Otherwise, disregard these pages and options. They don't matter if you're delivering the stream to viewers only through your external CDN provider.
Wowza Video creates the live stream and displays the Overview tab of the live stream detail page.
2. Configure the stream target for the highest-bitrate output
Next, add a custom stream target for your CDN provider and attach it to the highest bitrate output rendition of your live stream.
- Under Advanced on the left navigation bar, click Transcoders, and then select your live stream's transcoder. It appears as [Live stream name] / Transcoder.
- Click the Outputs & Targets tab of the trancoder's detail page.
The Outputs & Targets tab of the trancoder's detail page lists all of the output renditions for your live stream. Wowza Video created them based on the aspect ratio of the source video that you specified in the live stream wizard.
The output renditions are listed from highest to lowest resolution. The first output is the highest-bitrate rendition.
- Click the Add a Stream Target button for the highest-bitrate output rendition and choose Custom.
- On the Create a custom stream target page, enter a descriptive Target Name.
- Click the Provider menu and choose your CDN provider. If your provider isn't listed, choose RTMP.
- Specify the details of your CDN provider so that Wowza Video can connect to it. Consult your CDN provider's documentation if you need help with these values.
- Primary URL – The RTMP ingest URL of the target, without the preceding protocol and without the trailing slash (/). For example, [domain-or-ip-address]/[EntryPoint]. Hostnames can't contain underscores (_).
- Backup URL – The backup RTMP ingest URL of the target, entered without the preceding protocol and without the trailing slash (/). Not all providers or third-party CDNs provide a backup URL.
When both the primary and backup URLs are used, Wowza Video sends the stream to both URLs, allowing the third-party CDN to improve reliability and prevent playback disruption. If you want to use both URLs, after assigning the target to an output rendition, make sure both the primary and backup versions have entries under the output rendition on the transcoder's Outputs & Targets tab. - Stream Name – The name of the stream as defined in your target's ingestion settings.
Note: When adding a custom Akamai target, the Stream Name must be in the format [stream_name]_[angle]_[bitrate]@[stream_id], for example, akamaistream_1_[bitrate]@12345. For help determining the Stream Name for other CDN providers, see their documentation.
- Target Username – The name or ID that your target uses for RTMP authentication.
- Target Password – The password that's used with your Target Username for RTMP authentication. Enter it in the Confirm Target Password field, too.
- HDS Playback URL – (Optional) The web address that your target uses to play HDS streams. You can include it here for informational purposes.
- HLS Playback URL – (Optional) The web address that your target uses to play HLS streams. You can include it here for informational purposes.
- RTMP Playback URL – (Optional) The web address that your target uses to play RTMP streams. You can include it here for informational purposes.
- Click Add.
3. Assign the target to the other output renditions
Now assign the target to the other, lower-resolution output renditions for the live stream.
- For the next output rendition in the list, click the Add a Stream Target and then click Existing stream target.
- In the Assign a Stream Target window, select your custom stream target from the list and then click Assign Stream Target.
- Repeat Steps 1 and 2 for the remaining output renditions for your live stream.
- (Optional) If you're not using them, delete the default targets that Wowza Video created automatically for each output rendition.
4. Set up the encoder
Make sure you have the latest firmware for your encoder installed. See the encoder's user guide for details about how to update firmware as well as how to operate the device and how to specify settings such as resolution, bitrate, and frame rate.
See the Source Connection Information on the Overview tab of the Live Stream Details page for server, port, and other details your encoder may need to connect to Wowza Video.
5. Test the connection
Finally, connect the configured live stream to the source encoder or camera and test the setup.
- Select the live stream to view its details page.
- Click Start Live Stream at the top of the page.
- Click the confirmation button to start the stream.
Wowza Video opens the stream and connects with the video source.
- Start your video source.
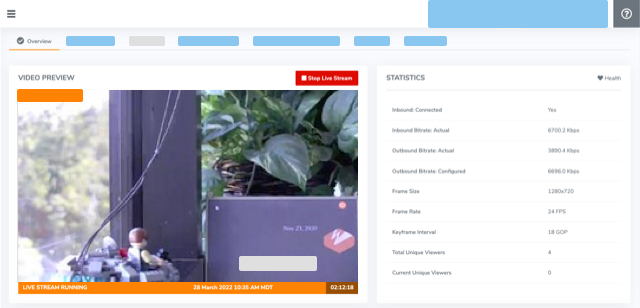
- In the Wowza Video web manager, confirm that the live stream is playing by looking at the Video Preview in the Overview tab of the Live Stream Details page.
The video preview displays a frame from the live stream every 5 seconds. The started date and time appear under the preview. Source stream, transcoder, and delivery metrics begin to update.
- Check playback at your CDN by viewing the stream at the provider's playback URL.
- Click Stop Live Stream at the top of the detail page to end your test stream, and then stop the video source.


