This guide describes how to install and set up Wowza Streaming Engine™ media server software on a Linux virtual machine instance in Microsoft Azure.
Microsoft Azure is a cloud-computing platform that virtualizes computing resources as virtual machines. Wowza Media Systems™ provides pre-configured and tuned Wowza Streaming Engine virtual machine images that are ready to start in Microsoft Azure without using command-line tools. The Wowza Streaming Engine virtual machine includes a default startup package that supports live and video-on-demand (VOD) streaming.
Notes:
- The latest pre-configured virtual machine runs WSE 4.11.2
- This guide assumes basic familiarity with the Linux operating system and Wowza Streaming Engine.
- For information on Linux VMs on Azure, see the Microsoft documentation Linux Virtual Machines.
Licensing Wowza Streaming Engine for Azure
There are two ways to license Wowza Streaming Engine for Microsoft Azure.
For all Wowza Streaming Engine versions, you can bring your own license (BYOL) for Wowza Streaming Engine. With a BYOL license, you can use any Wowza Streaming Engine Subscription or Perpetual license key with your Microsoft Azure instance.
For BYOL licenses, Microsoft manages the billing for your running instance time, storage, and bandwidth consumption. If you use a Wowza Streaming Engine Monthly Subscription license key, you'll also get a monthly invoice from Wowza for usage of the Streaming Engine software.
Note: You can purchase Subscription licenses for Wowza Streaming Engine on our Wowza Streaming Engine Pricing page. If you already have a license, it will work with all Wowza Streaming Engine virtual machine images under the terms of your license agreement. If you want to upgrade your older license, see our software upgrade options page for details.
You can buy a Wowza Streaming Engine virtual machine image with an embedded license for Wowza Streaming Engine from Microsoft. The embedded license enables unlimited use of the Transcoder (for 64-bit instances only), nDVR, and DRM features. This paid licensing option provides the convenience of a combined monthly invoice from Microsoft for running instance time, storage, bandwidth consumption, and Wowza Streaming Engine usage.
Sign up for Microsoft Azure
You must subscribe to Microsoft Azure before you can start using Wowza Streaming Engine for Microsoft Azure. If you're new to Microsoft Azure, Microsoft offers a 30-day free trial so you can try it out. You must use a Microsoft account to subscribe to Azure or to try out the 30-day Azure Preview.
To get started using Wowza Streaming Engine for Microsoft Azure, sign in to the Azure Management Portal using your Microsoft account. The portal enables you to create and manage your Azure cloud resources, such as websites, virtual machines, and storage accounts, from a web browser. After you get started, the portal will be your home to configure, monitor, and scale your resources.
Set up a Wowza Streaming Engine virtual machine
Get a pre-configured Wowza Streaming Engine software virtual machine image
- In the Azure Management Portal Dashboard, click Marketplace.
- In the Marketplace, search for Wowza Streaming Engine and then select Wowza Streaming Engine from the results.
- In Select a software plan, select either Wowza Streaming Engine (Linux BYOL) or Wowza Streaming Engine (Linux PAID) depending on which licensing option you're using.
- Click Create to start configuring the Wowza Streaming Engine for Windows virtual machine.
Configure the virtual machine
Use the Create a virtual machine blade to configure your Wowza Streaming Engine virtual machine.
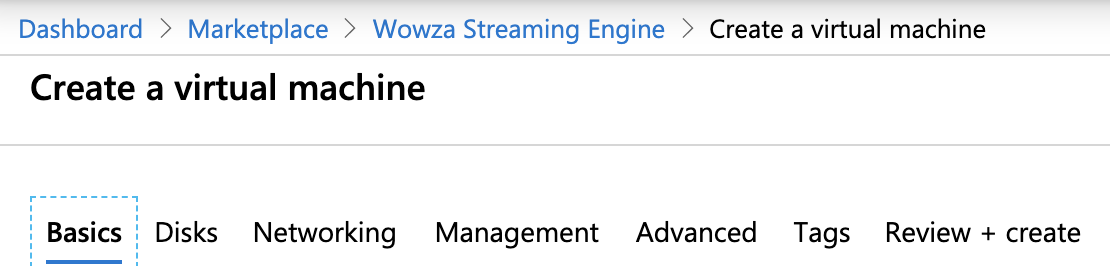
- In the Basics blade, complete the following:
- In Resource group, specify the resource group. To select an existing resource group, click the arrow in the list box to reveal existing resource groups. To create a new resource group, click Create new, and then type a name for it in the Name box. For details, see Manage resource groups.
- In Virtual machine name, enter a name for your virtual machine. The name becomes part of the URI that's used to contact the virtual machine and must be unique in the Azure cloud domain (.cloudapp.net).
- In Region, select the region where the virtual machine instance will be located. It's best to select a location that has the lowest latency to a camera or encoder that's delivering a live stream to Wowza Streaming Engine.
- In Size, click Select Size and choose the size that you want to use.
The Standard sizes offer the most flexibility and support all virtual machine configurations and features. For an SSD VM disk type, we recommend the DS1, DS2, or DS3 Standard sizes. For an HDD VM disk type, we recommend the D1, D2, or D3 Standard sizes.
Notes:- Don't use the A0 Standard size. It doesn't have enough CPU resources to run Wowza Streaming Engine.
- For an HDD VM disk type, additional Basic sizes are provided. These sizes are economical options for development workloads, test servers, and other applications that don't require load-balancing, auto-scaling, or memory-intensive virtual machines.
- Don't use the A0 Standard size. It doesn't have enough CPU resources to run Wowza Streaming Engine.
- In Authentication type, click SSH public key.
- In Username, type the name of the account that you'll use to administer the virtual machine (you can't use root for the user name).
- In SSH public key, copy and paste an OpenSSH public key that will be used to authenticate the account user name.
Note: You can generate an OpenSSH public key with tools like ssh-keygen on Linux and macOS or PuTTYgen on Windows. For details, see Create and use an SSH public-private key pair for Linux VMs in Azure.
- In Resource group, specify the resource group. To select an existing resource group, click the arrow in the list box to reveal existing resource groups. To create a new resource group, click Create new, and then type a name for it in the Name box. For details, see Manage resource groups.
- In the Disks blade, choose a disk type in OS disk type.
Azure solid state disks (SSD) are backed by solid state drives and offer consistent, low latency performance. They provide the best balance between price and performance and are ideal for I/O-intensive applications and production workloads. Azure hard drive disks (HDD) are backed by magnetic drives and are preferable for applications where data is accessed infrequently. - In the Networking blade, configure network settings for the virtual machine. For more information about ports used by Wowza Streaming Engine, see Configure streaming ports.
Adding a firewall rule to enable support for RTP and MPEG-TS UDP streaming
Some encoders may deliver live streams to Wowza Streaming Engine over UDP. To allow them to connect, create a new inbound rule in your default firewall settings:
- In Configure network security group, click Create new.
- In the Create network security group blade, click Add an inbound rule.
- In the Add inbound security rule blade, specify the following information:
- Under Source, select an option to specify from which IP address/IP address range the inbound traffic will come from.
- In Source port ranges, enter the UDP port or port range that the inbound traffic will use.
- Under Protocol, click UDP.
- Under Action, click Allow.
- In Priority, enter a value that specifies when your new rule will be processed in relation to the other default rules.
- In Name, enter a name for your rule.
- Under Source, select an option to specify from which IP address/IP address range the inbound traffic will come from.
Creating a public IP address that's static
The default allocation method for public IP addresses is dynamic, which means that the IP address may change when you stop and start a resource. To permanently reserve the public IP address so that it's always the same, do the following:
- In Public IP, click Create new.
- In the Create public IP address blade, set the Assignment to Static.
There's a nominal charge to use static public IP addresses. For more information, see IP address pricing. - In Configure network security group, click Create new.
- In the Review + create blade, review the configuration of the virtual machine that you're about to create.
- Click Create.
The Azure system provisions and then starts your virtual machine. This process takes several minutes. After Azure creates the virtual machine, the Azure Management Portal displays it in a blade on the Dashboard. Click Go to resource to view your virtual machine blade with configuration information, connection details, and access to additional tools.
Connect to the virtual machine
Microsoft Azure opens an endpoint automatically for you to access the virtual machine through a Secure Shell (SSH) connection so that you can manage the virtual machine settings and the applications that run on the machine. You must log in to the machine to get the username and password that's required to sign in to Wowza Streaming Engine Manager so that you can configure and manage the Wowza Streaming Engine media server software.
To do this, you must install an SSH client on the computer that you'll use to access the virtual machine. There are many SSH client programs that you can choose from, but two popular choices are:
- PuTTY – If you're using a computer that's running a Windows operating system.
- OpenSSH – If you're using a computer that's running a Linux operating system.
This section shows you how to use PuTTY to access the virtual machine.
Log in to the virtual machine
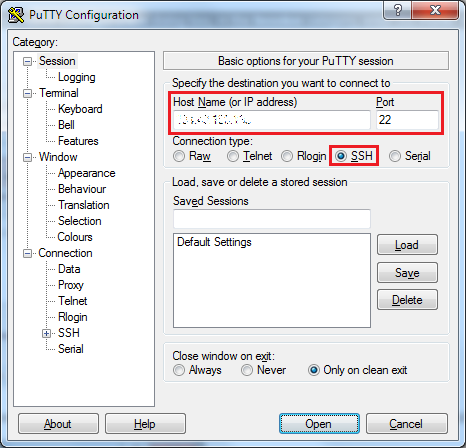
- In the Azure portal, open your virtual machine blade and copy the Public IP address.
- Open the PuTTY SSH Client (putty.exe). In the PuTTY Configuration dialog box, in the Session category, enter the Public IP address that you copied into the Host Name box and use the default Port value (22).
- In the Connection > SSH > Auth category, in the Authentication parameters area, click Browse to find and open the PuTTy Private Key (.ppk) file, and then click Open.

- Select one of the options in the PuTTY Security Alert dialog box to continue the connection.
- Log in to the virtual machine using the name of the administrator account that you created during virtual machine setup.


You can now work with the virtual machine just as you would with any other server.
Sign in to Wowza Streaming Engine Manager
- In the PuTTY Terminal window, type the following commands:
cd /usr/local/WowzaStreamingEngine/conf
cat admin.password
- Copy the user name (wowza) and string that's used as a temporary password.

- In a new browser tab, go to http://[instance-public-dns]:8088/enginemanager where [instance-public-dns] is the Public IP address from the virtual machine blade in the Azure portal.
- Sign in to Wowza Streaming Engine Manager using the temporary credentials.

Note: We recommend using SSL/TLS to securely connect to Wowza Streaming Engine Manager over HTTPS. For more information, see Connect to Wowza Streaming Engine Manager over HTTPS.
Add your Wowza Streaming Engine license key
The Wowza Streaming Engine server on the virtual machine is pre-loaded with a temporary license key. This license key doesn't enable use of the Transcoder, Wowza nDVR, and Wowza DRM features in the software. Follow the instructions in Add license keys to replace the temporary license key with your Subscription or Perpetual license key for Wowza Streaming Engine.
Change the administrator account for Wowza Streaming Engine Manager
We recommend that you create a new user account to manage Wowza Streaming Engine virtual machine instances through Wowza Streaming Engine Manager. Follow the instructions in Create user accounts to create a new user account with Administrator access.
After you create this new account, sign out of the manager and then sign in using the new account. You can then delete the temporary wowza account if desired.
Test the virtual machine instance
To test playback from the virtual machine instance, use your Azure virtual machine's public IP address as the Server in playback URLs. You can get your Azure virtual machine's Public IP address value from the virtual machine blade in the Azure portal.
Wowza Streaming Engine installs a sample VOD file that you can use to test whether the software is running properly and can serve content.
- In Wowza Streaming Engine Manager, create a new VOD application.
- Click the Applications tab and then click Add Application in the contents panel.
- On the Add Application page, click the VOD Single server button to select that application type.
- In the New Application dialog box, enter a name and then click Add.
- Click Save.
- From your application's page, click Test Playback. The Test Playback window is configured to use the sample.mp4 video file that installs with Wowza Streaming Engine.
- Copy one of the playback URLs.
When you can successfully play sample.mp4, then Wowza Streaming Engine is running properly.
Note: Due to the way that Azure processes variable lookup metadata, in the Test Playback window, the Server field may show your virtual machine's private IP address, and not the required public IP address. To permanently substitute the public IP address for the Test Playback window and for the Home and Sources (Live) pages in Wowza Streaming Engine Manager, you can update a Wowza Streaming Engine property setting. For more information, see Startup delays and hostname resolution problems on Azure Marketplace virtual machines.
Stop the instance
Stopping an instance won't delete its data, but it will de-allocate the public IP address. (You can restart a virtual machine that's stopped later and it will retain its domain name and the hostname provided at configuration time.) Azure doesn't charge for stopped instances.
To stop the instance, in your virtual machine blade, click the Stop icon.
It may take a minute or two for the virtual machine to stop. Look for the Successfully stopped virtual machine notification to make sure that the virtual machine stopped successfully.
Delete the instance
To delete the virtual machine completely, in your virtual machine blade, click the Delete icon.


