Learn how to use an RTMP-based encoder as the video source for a Wowza Video™ live stream. The Wowza Video service can connect to any H.264 encoder that supports the RTMP network protocol.
You can set up the encoder first, or set up the live stream in Wowza Video first. Either way, when you start the live stream in Wowza Video, it will periodically try to connect to the encoder until the encoder comes online.
To learn about other live stream settings you might see in the user interface, see Live Stream Setup page in Wowza Video.
1. Create a live stream
- Sign in to Wowza Video.
- Click Add Live Stream.
- On the Live Stream Setup page, enter a Live Stream Name, choose a Broadcast Location, and then click Next.
- On the Video Source and Transcoder Settings page, select Other RTMP as the camera or encoder you want to use to connect to Wowza Video.
- Specify how the encoder will communicate with Wowza Video:
- Select Push Stream if your encoder will push the stream to Wowza Video.
- Select Pull Stream if your encoder requires that Wowza Video pull the stream the encoder.
- Do one of the following:
- For push streams, select Push directly to Wowza Video to send the stream to the transcoder at the live stream's Broadcast Location.
If you have problems with the direct connection to Wowza Video, select Push to a stream source to route the stream through a CDN endpoint as an alternative.
- For pull streams, enter the encoder's Source URL. See the encoder's user guide for information about its URL. The hostname or IP address in the URL must be publicly accessible. If authentication information, such as username and password, is included in the source URL, it can only contain alphanumeric, period (.), underscore (_), and hyphen (-) characters.
- Specify other video source settings, and make sure to select the same Input Resolution that you use in your encoder.
- Click Next, and complete the steps to finish creating the live stream.
Wowza Video creates the live stream and displays the Overview tab of the live stream detail page.
2. Set up the encoder
Make sure you have the latest firmware for your encoder installed. See the encoder's user guide for details about how to update firmware as well as how to operate the device and how to specify settings such as resolution, bitrate, and frame rate.
See the Source Connection Information on the Overview tab of the live stream detail page for server, port, and other details your encoder may need to connect to Wowza Video. You'll need to refer to documentation for your specific encoder to determine where to input the source connection information settings, which include the stream and user credentials for authentication.
If you were configuring OBS as the encoder, you'd enter the following stream settings in OBS:
- URL is formatted as:
rtmp://[stream key].[primary server]/[application]
Where:- Stream key is the stream name value, such as b01bda67.
- Primary Server is the ingest location of the server
- Host Port is the port (by default 1935)
- Application is the application name for the stream assigned by Wowza Video
- Username and Password are the source username and source password values.
Other encoders might use different names in their user interface, like Address instead of URL and Stream instead of Stream key. Make sure to refer to your encoder's documentation to determine the correct locations.
Note: Wowza Video accepts streams over RTMPS on port 443, if your camera or encoder can deliver over it.
3. Test the connection
- In Wowza Video, select the live stream that uses the RTMP encoder as its video source.
- Click Start Live Stream at the top of the live stream detail page.
- Click Start to confirm that you want to start the stream.
Wowza Video opens the stream and connects with the encoder.
- Start the encoder.
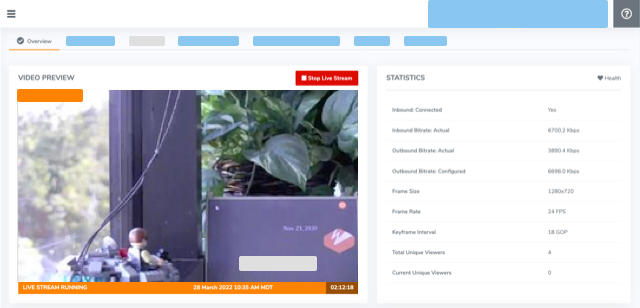
- In the Wowza Video web manager, confirm that the live stream is playing by looking at the Video Preview in the Overview tab of the Live Stream Details page.
The video preview displays a frame from the live stream every 5 seconds. The started date and time appear under the preview. Source stream, transcoder, and delivery metrics begin to update.

- Click Stop Live Stream at the top of the live stream detail page to end your test stream, and then stop the encoder.
Note: If you configure a camera or encoder to push video to the Wowza Video service, it may take up to 10 seconds once the live stream or transcoder has started for the encoder to connect. This is due to DNS lookup of the host server's IP address. For a more immediate connection, in the encoder settings, use the IP address that's visible in Wowza Video after the live stream or transcoder has started. See Speed up the connection to a transcoder in Wowza Video for more information.


