nDVR in Wowza Streaming Engine™ media server software lets you record a live stream while simultaneously allowing viewers to play or pause the live stream, rewind to a previously recorded point, and resume viewing at the current live point when playing streams on any device or player that support the HLS and MPEG-DASH protocols.
Note: Wowza Streaming Engine 4.7.6 or later is required to use nDVR for MPEG-DASH streaming.
Before you start
You should complete the following tasks:
- Review Get started with nDVR in Wowza Streaming Engine for information about requirements and best practices for using nDVR.
1. Enable and configure nDVR for a live application
This section provides the steps for setting up an application for live streaming with nDVR using Wowza Streaming Engine Manager.
Note: Wowza Streaming Engine must be properly licensed to enable nDVR. For details, see About live stream nDVR.
Wowza Streaming Engine Manager
- Click your live application in the contents panel and then click nDVR.
- Click Enable nDVR.
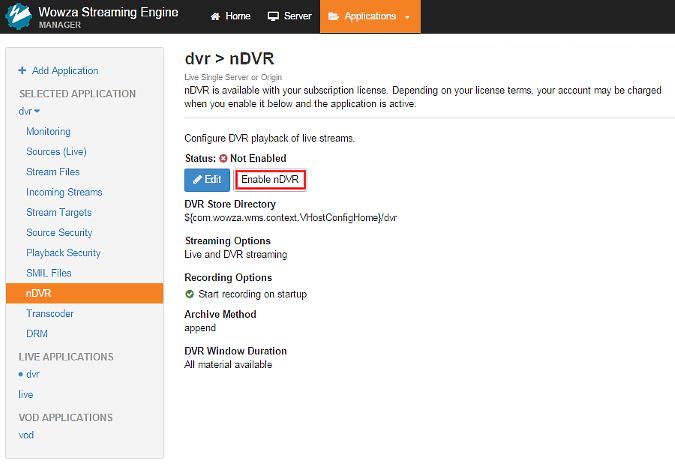
- Click Restart Now to apply the changes.


The Status field will show that nDVR is enabled.
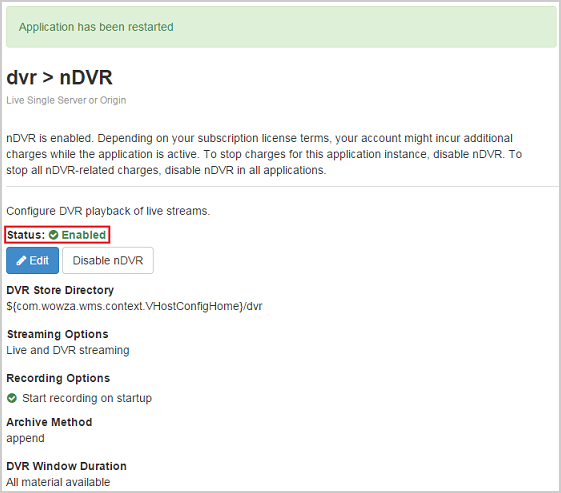
- Click Edit to configure nDVR settings for the application. You can use these settings to customize your application configuration to control nDVR behavior.
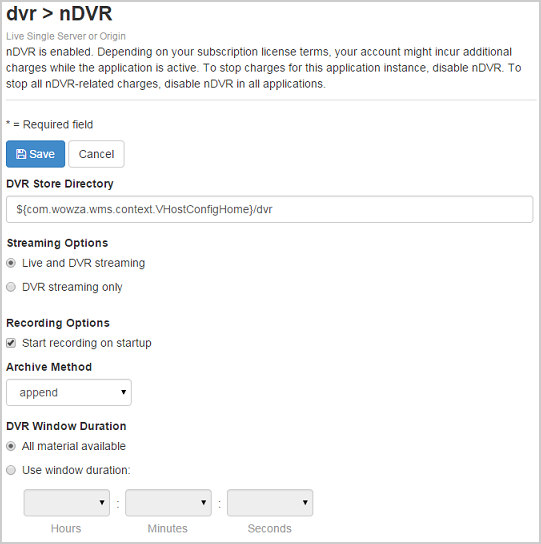
DVR store directory
Specifies the top-level folder where DVR streams are stored. This can contain an explicit path (for example, C:/myDvr) or environment variable (for example, ${com.wowza.wms.context.VHostConfigHome}). The following environment variables are supported.
${com.wowza.wms.AppHome} Application home directory ${com.wowza.wms.ConfigHome} Configuration home directory ${com.wowza.wms.context.VHost} Virtual host name ${com.wowza.wms.context.VHostConfigHome} Virtual host config directory ${com.wowza.wms.context.Application} Application name ${com.wowza.wms.context.ApplicationInstance} Application instance name The DVR store directory is a folder structure containing the application name, the application instance name, the stream name, and a version number. For example, if DVR Store Directory is set to C:/myDvr, and the incoming live stream name is myStream, streams for the dvr application would be stored in C:/myDvr/dvr/_definst_/myStream.0, C:/myDvr/dvr/_definst_/myStream.1, and so on.
Streaming options
Specifies how an incoming live stream can be played by indicating whether the ?DVR query parameter must be appended to playback URLs.
Recording options
Select Start recording on startup to automatically begin recording a live stream that's published to the application for DVR when the application starts. If you want to manually control when the recording starts, you must use the nDVR recording API.
Archive method
Specify what to do with a recording if a new stream with the same stream name is published to this application. The default option (append) appends the new stream to the existing recording and is best to use as a failsafe mechanism to account for disruptions in the current live stream (such as encoders restarting). The delete option deletes the previous recording and starts a new one. The version option starts recording the new stream to a new folder in the DVR store directory.
DVR window duration
Specify the amount of recorded content in the DVR store that's available for DVR playback.
Note: You can record up to 30 hours of content for DVR playback; however, you may encounter performance and playback issues if you make longer durations of content available for playback. For best practices guidance, see Recording length.
- To specify that a live stream can be played using the DVR playback controls in a player, select DVR streaming only. This option means that the ?DVR query parameter must be appended to playback URLs.
- To specify that a live stream can be played with or without DVR playback controls, select Live and DVR streaming. This option means that the live stream is available for playback with or without the ?DVR query parameter appended to playback URLs. If ?DVR isn't appended to the playback URL, the live stream can still be played but DVR playback isn't supported.
- To make the entire recording available for playback, select All material available. This option enables viewers who join the live stream in-progress to rewind and watch the stream from the beginning. This option also preserves the live stream recording after the stream ends.
- To make only part of the live stream available for playback, select Use window duration and then specify the duration in Hours:Minutes:Seconds. The minimum supported duration value is 60 seconds. This option enables viewers who join the live stream in-progress to rewind the stream for the duration that you specify and watch from that point forward. The duration window is a "floating window" that always ends at the current live point. Recorded data that falls outside this window is purged from the DVR store.
- To specify that a live stream can be played using the DVR playback controls in a player, select DVR streaming only. This option means that the ?DVR query parameter must be appended to playback URLs.
- Click Save, and then click Restart Now to apply changes to nDVR settings for the application.


Note: Additional nDVR configuration properties are documented in Configure advanced properties for Wowza nDVR.
XML
This section provides the steps for setting up an application for live streaming with nDVR capabilities by configuring an application's Application.xml file. This is an alternative to configuring the application in Wowza Streaming Engine Manager.
- Open the Application.xml file for your live application ([install-dir]/conf/[application-name]) and make the following changes (some of these settings may already be present):
- Set the <Streams>/<LiveStreamPacketizers> property to:
<LiveStreamPacketizers>dvrstreamingpacketizer</LiveStreamPacketizers>
This setting enables DVR content to originate from the recorded store for this Wowza Streaming Engine instance and be streamed to any HTTPStreamer.
In addition to DVR streaming, you can enable live streaming for the application by adding additional packetizers. For example:<LiveStreamPacketizers>cupertinostreamingpacketizer,mpegdashstreamingpacketizer</LiveStreamPacketizers>
- Set the <DVR>/<Recorders> property to:
<Recorders>dvrrecorder</Recorders>
- Set the <DVR>/<Store> property to:
<Store>dvrfilestorage</Store>
- Set the HTTPStreamers property to the streaming protocols that you want to stream to. For example:
<HTTPStreamers>cupertinostreaming,mpegdashstreaming</HTTPStreamers>
- Set the <Streams>/<LiveStreamPacketizers> property to:
- Customize additional nDVR properties for your application in Application.xml to control the archive method and availability of your recorded streams.
<DVR>/<StorageDir> - Specify the top-level folder where DVR streams are stored. See DVR store directory.
<DVR>/<ArchiveStrategy> - Specify what to do with a recording if a new stream with the same stream name is published to this application. See Archive method.
<DVR>/<WindowDuration> - Specify the amount of recorded content (in seconds) in the DVR store that's available for DVR playback. To make all of the recorded content available for DVR playback, enter 0. See DVR window duration.Additional nDVR configuration properties are documented in Configure advanced properties for Wowza nDVR.
- Restart Wowza Streaming Engine to apply the changes.
2. Publish the stream to Wowza Streaming Engine
After configuring nDVR for your live application, publish a live stream to the application. Refer to the following resources for help with publishing a live stream from various cameras and encoders to the Wowza Streaming Engine origin server:
If you selected Start recording on startup, the dvr application will automatically record the stream when the encoder begins sending it, and users can seek to earlier segments of the live stream. If you want to manually control when the recording starts, you must use the Wowza nDVR recording API.
3. Test playback
nDVR playback is only supported with HLS and MPEG-DASH. To play a live stream with DVR capabilities, include the ?DVR query string at the end of the playback URL.
- From your application's page in Wowza Streaming Engine Manager, click Incoming Streams.
- Click the name of your stream and then click Test Playback from your stream's page.
- Review and, if needed, edit the following information in the Test Playback window for your stream:
- Server – The IP address or domain name of the server and the streaming port ([address]:[port]).
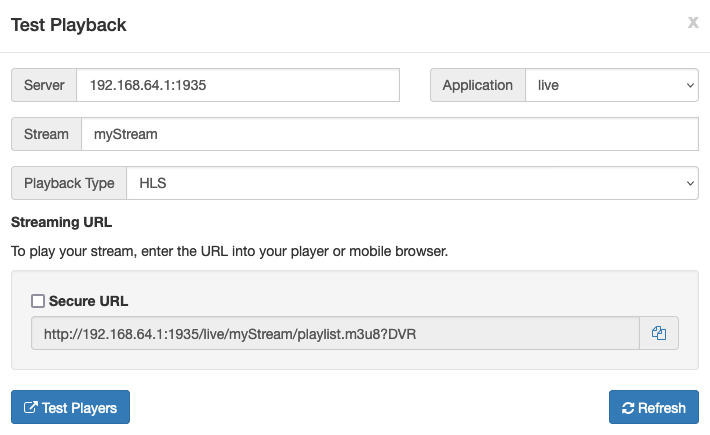
- (Optional) In the Streaming URLs section, select Secure URL for the streaming protocol you want to use to test playback if you have configured SSL/TLS for streaming.
- Click the Copy icon for the HLS or MPEG-DASH streaming URL.
Note: The end of the URL should include the ?DVR query string.
- Paste the playback URL into your player or a mobile browser depending on the protocol. Alternatively, you can use the Wowza Video Test Players webpage.

For more information about playback URLs, see About playing Wowza Streaming Engine streams.
Troubleshooting
Logging
nDVR uses the Wowza Streaming Engine log files in [install-dir]/logs. For more information about logging capabilities, see the Wowza Streaming Engine User Guide (PDF).
Running Wowza Streaming Engine in standalone mode enables you to view these messages in real-time from the console window. For a list of messages, scenarios that may cause them, and suggestions for resolution, see Troubleshoot error messages in Wowza Streaming Engine.
Logging messages in wowzastreamingengine_access.log indicate if Wowza Streaming Engine and nDVR are configured properly. If so, the logs will show nDVR being initialized and configuration information being read from Application.xml. All messages, including warnings and errors, are logged in the wowzastreamingengine_access.log file.
Troubleshooting tests
Test #1: Playback basic live streaming without nDVR
Use one of the following articles to verify that your basic live streaming setup is working properly without nDVR recording enabled. The DVR/Recorders property should be disabled in the Application.xml file.- Set up live streaming using an RTMP-based encoder in Wowza Streaming Engine
- Set up live streaming using an RTSP/RTP-based encoder in Wowza Streaming Engine
- Publish and play a live stream (MPEG-TS based encoder) in Wowza Streaming Engine
- Set up live streaming using a native RTP encoder with SDP file in Wowza Streaming Engine
- Stream over MPEG-DASH with Wowza Streaming Engine
Note: RTMP and RTSP don't support DVR.
Test #2: Play a single recorded stream
After you verify that Wowza Streaming Engine is configured correctly for live streaming and you can play the stream successfully, enable recording again and test the playback of a recorded stream using the provided sample video and player. Make sure that you can record and playback with the basic single server scenario before you try to set up an origin/edge configuration or playback recorded groups (StreamNameGroups created by Transcoder or SMIL files).
- Re-enable recording in Application.xml by setting the DVR/Recorders property to:
<Recorders>dvrrecorder</Recorders>
- Use one of the above articles about setting up live streaming to test playback of a single recorded stream.
If you can't playback the newly recorded stream, use the following troubleshooting checklist:
- Verify that a directory was created to store your recorded files after publishing the live stream to Wowza Streaming Engine. By default, a directory named dvr is created at [install-dir]/dvr.
- Verify that the <DVR>/<Recorders> property in Application.xml is set to:
<Recorders>dvrrecorder</Recorders>
This setting enables nDVR.
- Verify that the <Streams>/<LiveStreamPacketizers> property in Application.xml is set to:
<LiveStreamPacketizers>dvrstreamingpacketizer</LiveStreamPacketizers>
Without this value, the dvr directory can't be created.
Note: If the live source that provides input to Wowza Streaming Engine stops or disconnects, it might prevent nDVR from recording.
- Verify that the <DVR>/<Store> property in Application.xml is set correctly. If not configured properly, a log message will indicate that nDVR can't record and why. For more information about error messages and common causes, see Troubleshoot error messages in Wowza Streaming Engine.
Note: This property shouldn't be set on edge servers if you're setting up the more complex live stream repeater (origin/edge) configuration for use with nDVR. Be sure to carefully follow the instructions in Set up a Wowza Streaming Engine live stream repeater for nDVR to avoid errors.
- Verify that your Archive Method setting is correct. Check the Archive Method setting for the application in Wowza Streaming Engine Manager (<DVR>/<ArchiveStrategy> property setting in Application.xml) if the DVR storage directory doesn't have your recorded files. If not configured properly, a log message will indicate that nDVR can't record and why.
- Look for messages in the access.log file that indicate Wowza nDVR is initialized and has the required configuration information. The following are sample successful log messages where the application name is dvr and stream name is myStream.
INFO application app-start _definst_ dvr/_definst_
INFO session connect-pending 192.168.1.50 -
INFO session connect 192.168.1.50 -
INFO stream create - -
INFO stream publish myStream -
INFO server comment - LiveStreamDvrRecorderBase.initProperties[dvr/_definst_/myStream] : properties:
INFO server comment - DvrStreamManagerBase.initProperties[dvr/_definst_/myStream] : {Properties: isDvrPacketizer: true}
INFO server comment - DvrStreamManagerBase.initStorage[dvr/_definst_/myStream] : storeName:dvrfilestorage isRecorder:true hasStorage:true
INFO server comment - MediaStreamMap.getLiveStreamPacketizer[dvr/_definst_/myStream]: Create live stream packetizer: dvrstreamingpacketizer:myStream
INFO server comment - DvrStreamStoreBase.initProperties[dvr/_definst_/myStream/myStream.0] : properties:[dvrWindowDuration:0, dvrChunkGroupingSeconds:600, dvrAllowableAVPacketDelta:2000, dvrResetTimePacketDelta:200, dvrPacketDeltaToNotify:200]
INFO server comment - LiveStreamDvrRecorder.init[dvr/_definst_/myStream]: audioOnlyChunkTargetDuration: 2000 ms
INFO server comment - LiveStreamDvrRecorder.init[dvr/_definst_/myStream]: dvrWaitForCodecTime: 8000 ms
INFO server comment - LiveStreamDvrRecorder.init[dvr/_definst_/myStream]: recordAudio: true
INFO server comment - LiveStreamDvrRecorder.init[dvr/_definst_/myStream]: recordVideo: true
INFO server comment - LiveStreamDvrRecorder.init[dvr/_definst_/myStream]: recordData: true
INFO server comment - MediaStreamMap.getDvrRecorder[dvr/_definst_/myStream]: Create DVR Recorder: dvrrecorder
INFO server comment - LiveStreamDvrRecorder.resetStream[dvr/_definst_/myStream]
INFO server comment - DvrStreamStoreBase.resetTimeMap[dvr/_definst_/myStream/myStream.0] : resetTime=0
INFO server comment - DvrPacketHandler.handlePacket[]: Video codec:H264 isCompatible:true
INFO server comment - DvrPacketHandler.handlePacket[]: Audio codec:AAC isCompatible:true
INFO server comment - LiveStreamDvrRecorder.reportCodecInformation[dvr/_definst_/myStream][avc1.66.31]: H.264 Video info: {MediaCodecInfoVideo: codec:H264, profile:Baseline, level:3.1, frameSize:640x480, displaySize:640x480, frameRate:30.000000}
INFO server comment - LiveStreamDvrRecorder.reportCodecInformation[dvr/_definst_/myStream][mp4a.40.2]: AAC Audio info: {MediaCodecInfoAudio: codec:AAC, channels:2, frequency:48000, samplesPerFrame:1024, objectType:LC}
INFO server comment - DvrStreamStoreBase.storeChunks[dvr/_definst_/myStream/myStream.0] :  Resetting dvr time from dvr:0/pt:0 to dvr:0/pt:0/utc:1389136379031
INFO server comment - LiveStreamDvrRecorder.endChunk[dvr/_definst_/myStream]: Add chunk: ind:0 a/v/k: packets: 240/150/11 durations: 5119/5149/5149 dvrTimes:0/0/0 pTimes:0/0/0
INFO server comment - LiveStreamDvrRecorder.endChunk[dvr/_definst_/myStream]: Add chunk: ind:1 a/v/k: packets: 240/150/10 durations: 5121/5072/5072 dvrTimes:5119/5149/5516 pTimes:5119/5149/5516
INFO server comment - LiveStreamDvrRecorder.endChunk[dvr/_definst_/myStream]: Add chunk: ind:2 a/v/k: packets: 237/150/10 durations: 5055/5105/5105 dvrTimes:10239/10221/10521 pTimes:10239/10221/10521
INFO server comment - LiveStreamDvrRecorder.endChunk[dvr/_definst_/myStream]: Add chunk: ind:3 a/v/k: packets: 240/150/10 durations: 5119/5105/5105 dvrTimes:15295/15326/15526 pTimes:15295/15326/15526
INFO server comment - LiveStreamDvrRecorder.endChunk[dvr/_definst_/myStream]: Add chunk: ind:4 a/v/k: packets: 240/150/11 durations: 5120/5138/5138 dvrTimes:20415/20431/20531 pTimes:20415/20431/20531
INFO server comment - LiveStreamDvrRecorder.endChunk[dvr/_definst_/myStream]: Add chunk: ind:5 a/v/k: packets: 240/150/10 durations: 5120/5105/5105 dvrTimes:25535/25569/26003 pTimes:25535/25569/26003
INFO server comment - LiveStreamDvrRecorder.endChunk[dvr/_definst_/myStream]: Add chunk: ind:6 a/v/k: packets: 240/150/10 durations: 5121/5139/5139 dvrTimes:30655/30674/31008 pTimes:30655/30674/31008
INFO server comment - LiveStreamDvrRecorder.endChunk[dvr/_definst_/myStream]: Add chunk: ind:7 a/v/k: packets: 240/150/10 durations: 5121/5071/5071 dvrTimes:35775/35813/36013 pTimes:35775/35813/36013
INFO server comment - LiveStreamDvrRecorder.endChunk[dvr/_definst_/myStream]: Add chunk: ind:8 a/v/k: packets: 237/150/10 durations: 5055/5105/5105 dvrTimes:40895/40884/41018 pTimes:40895/40884/41018
INFO server comment - LiveStreamDvrRecorder.endChunk[dvr/_definst_/myStream]: Add chunk: ind:9 a/v/k: packets: 240/150/11 durations: 5120/5105/5105 dvrTimes:45951/45989/46023 pTimes:45951/45989/46023
INFO server comment - LiveStreamDvrRecorder.endChunk[dvr/_definst_/myStream]: Add chunk: ind:10 a/v/k: packets: 240/150/10 durations: 5120/5105/5105 dvrTimes:51071/51094/51528 pTimes:51071/51094/51528
Problems with #1, #2, and #3 above will be reported in the access.log file. Failure could be due to malformed Application.xml or an invalid or missing property in Application.xml. If you don't see the success messages, see Troubleshoot error messages in Wowza Streaming Engine for more information about how to troubleshoot nDVR startup error messages.
- Verify that nDVR is recording. If it is, folders are created in your storage directory and they will have files with .m4fa and .m4fv file name extensions.
- Verify that your live stream uses supported audio and video codecs.
Comment server        INFO 200 DvrPacketHandler.handlePacket[dvr/_definst_/myStream]: Video codec:H264 isCompatible:true
comment    server    INFO    200 DvrStreamStoreBase.initProperties[dvr/_definst_/myStream/myStream.0] : ChunkOriginURL=null
comment    server    INFO    200 DvrStreamStoreBase.initProperties[dvr/_definst_/myStream /myStream.0] : properties:[dvrChunkGroupingSeconds=600, dvrAllowableAVPacketDelta=2000, dvrResetTimePacketDelta=200, dvrPacketDeltaToNotify=200]
comment    server    INFO    200 DvrPacketHandler.handlePacket[dvr/_definst_/myStream]: Audio codec:AAC isCompatible:true
- Verify that the <Streams>/<StreamType> property in Application.xml is set to:
<StreamType>live</StreamType>
In Application.xml, the default StreamType is default. This is the setting for video on demand (VOD) and configures Wowza Streaming Engine to look for video files in the [install-dir]\content directory instead of a live stream. If this property is set to default instead of live, no DVR-related errors will be recorded in the access.log file and no DVR-related directories will be created.
Test #3: Playback of recorded files with live stream repeater (origin/edge) configuration
Carefully follow the instructions in Set up a Wowza Streaming Engine live stream repeater for nDVR.
- Verify that the Application.xml file is configured correctly on the origin server. For more information, see Configuring the origin server.
- Verify that the Application.xml file is configured correctly on each edge server. For more information, see Configuring the edge server.
- On the origin server, the HTTPStreamers property must be set to:
<HTTPStreamers>dvrchunkstreaming</HTTPStreamers>
This enables the origin to stream DVR audio and video chunks to the edge servers.
On the edge server, this property must be set to the protocols that you want to stream DVR to. For example:<HTTPStreamers>cupertinostreaming</HTTPStreamers>
- The <DVR>/<Store> property must be left empty on the edge server because only the origin server stores the data.
<Store></Store>
- Setting the <Streams>/<LiveStreamPacketizers> property to dvrstreamingrepeater on both origin and edge will cause errors. It's only required for edge servers.
- On the origin server, the HTTPStreamers property must be set to:
- Test live playback from the origin server. Configuration of additional LiveStreamPacketizers required.
- Test live playback from the edge server. Configuration of additional HTTPStreamers required.
- Test DVR playback from the origin server.
- Test DVR playback from the edge server.
Verify archive method
If you set the Archive Method property to version, a new directory (for example, myStream.1) is created when the directory myStream.0 already exists when:
- The stream is disconnected and then restarted.
- The stream times out and then reconnects.
If you want all recordings to be in the same directory, set the Archive Method setting to append (the default setting).
If you want the current recording of the same stream name to replace a previous recording, set the Archive Method to delete.
Manage encoder disconnects and restarts
nDVR depends on a continuous live stream. Encoders can unexpectedly disconnect and are often configured to automatically reconnect. You can specify the amount of time that nDVR waits for packets before it stops recording (the default value is 5 minutes). This timeout is meant to account for when encoders disconnect and then restart. See streamTimeout.
Audio/video alignment
nDVR expects the audio and video in an incoming stream to be aligned. Input streams with short keyframe intervals and aligned audio and video work best.
The following error in the log indicates an audio/video alignment problem.
ERROR server comment DvrStreamStoreBase.storeChunks[dvr/_definst_/myStream/myStream.0] : Skipping chunk. A/V packet times differ by 3025 ms, more than allowed 2000 ms. aTime=3749903889 vTime=3749906914
Alignment problem will cause chunks to not be recorded, which will degrade the recording. The best way to fix this is upstream from nDVR (typically the encoding process). While we strongly recommend that you fix any audio/video alignment issues before to recording, you can set nDVR properties to try and compensate for this problem. These properties won't fix alignment problems, but may help you to work around them. See dvrPacketSortTime and dvrAllowableAVPacketDelta.
Recording is missing audio or video
If audio and/or video is missing from a recording, the audio and/or video might not have been present when the stream codecs were being identified. For example, if only video was detected, then only video would be recorded and not the audio. You can increase the amount of time that nDVR waits to receive audio and video codec information after streaming has started. See dvrWaitForCodecTime.
Adaptive bitrate stream alignment
Information about nDVR chunks is recorded to log files by default without turning on additional debugging properties. This information enables you to verify that individual streams in an adaptive bitrate streaming group have properly aligned packets.
The following shows sample log lines for an application named liveDVR and stream named livestream1. The values are start times for audio, video, and data chunks for both nDVR timescale and packet timescale.
LiveStreamDvrRecorder.endChunk[liveDVR/_definst_/livestream1]: Add chunk: ind:0 a/v/k: packets: 84/30/0 durations: 1950/1983/-1 dvrTimes:3/0/-1 pTimes:680182/680179/0 LiveStreamDvrRecorder.endChunk[liveDVR/_definst_/livestream1]: Add chunk: ind:1 a/v/k: packets: 87/30/0 durations: 2020/2000/-1 dvrTimes:1953/1983/-1 pTimes:682132/682162/-1


