Wowza Streaming Engine™ media server software enables you to access and control Stream Recorders (formerly LiveStreamRecorders) by using either Wowza Streaming Engine Manager or the Java API. Stream Recorders can be started, monitored, and controlled in Wowza Streaming Engine Manager or programmatically by using LiveStreamRecordManager APIs.
This article focuses on how to use the Incoming Streams feature to record live streams to VOD assets for later playback. This article does not cover recording streams using nDVR or MediaCaster settings. See About recording in Wowza Streaming Engine for information about all recording methods.
Video tutorial: Record live streams using Incoming Streams
See how to record live streams using Incoming Streams in Wowza Streaming Engine Manager.
Supported file formats
To record a live stream to MP4 (QuickTime container) files, you must use the supported codecs to encode the live stream. When recording to the MP4 Format, the following video and audio codecs are supported:
- H.264
- AAC
- MPEG-1 Layer 3 (MP3)
- Speex (not recommended for new encoding configurations)
Viewing incoming live streams and recording status
To start a recording, you must publish a live stream to an application in Wowza Streaming Engine. Wowza Streaming Engine Manager includes an Incoming Streams page for each live application. This page displays all of the live streams being published to the application and their recording status. If you click a stream name, an Incoming Streams Details page is displayed for the stream. This page has more information about the incoming stream and its associated recording.
To get to the Incoming Streams Page for an application, do the following:
- Click the Applications tab at the top of Wowza Streaming Engine Manager.
- Click the name of your live application in the contents panel, and then click Incoming Streams.
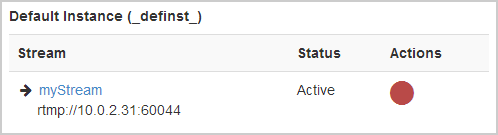
After publishing a live stream, under Default Instance (_definst), there should be a single stream with a status of Active and a Record icon under Actions.
Recording live streams in Wowza Streaming Engine Manager
In Wowza Streaming Engine Manager, you can record incoming streams with Live or Live HTTP Origin applications or manually record individual incoming streams with any application type.
Record a single incoming stream
You can start a recording, stop a recording, or segment ("split") an active recording manually on the Incoming Streams or Incoming Streams Details pages in Wowza Streaming Engine Manager.
Note: If you have selected Record all incoming streams for an application, you do not need to manually record individual incoming live streams for the application.
To start a recording for the example live stream myStream, which creates a single MP4 file, do the following:
- Click the Record icon to open the Recording dialog box.
- Configure the recording parameters as desired. Wowza Streaming Engine defaults to recording the live stream to a single MP4 file, where the filename is the same as the stream name.
Notes:
- The default values in the Recording dialog box can also be configured by using the StreamRecorder properties.
- If you're recording a WebRTC live stream, you must also configure the streamRecorderDefaultAudioSearchPosition and streamRecorderSkipKeyFrameUntilAudioTimeout properties. These properties ensure that the audio and video are synchronized in the recording, and can only be configured in Wowza Streaming Engine Manager on a live application's Properties tab. For more information, see Properties required to record WebRTC streams.
Recording tab
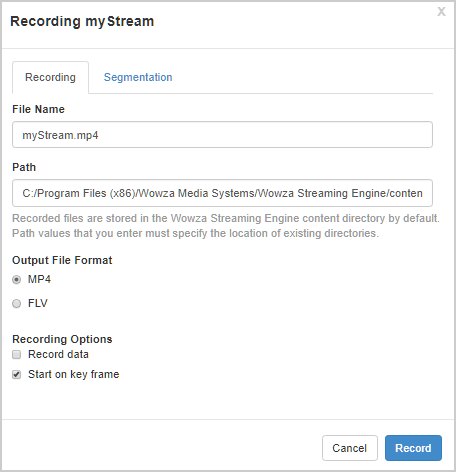
Filename - The base filename of the recorded file. You can change the default output filenames of your recorded files by entering a new filename. The name can't contain any of the following symbols: less-than (<), greater-than (>), colon (: ), quotation (' and "), forward slash (/), backslash (\), pipe (|), question mark (?), asterisk (*), double-dot (..), and tilde (~) characters.
Path - The physical path of a location on the computer where the recorded files are stored. By default, the files are stored in the server content directory, [install-dir]/content. If you want to store files in a different location, make sure that it exists on the computer and then specify its physical path. The path value can't contain any of the following symbols: less-than (<), greater-than (>), quotation (' and "), backslash (\), pipe (|), question mark (?), and asterisk (*) characters.
Output File Format - The video on demand (VOD) format of the recorded file: MP4 (default).
Recording Options- Record data - If metadata is available in the live stream, include it in the recorded file.
- Start on keyframe - Start recording the live stream at the first keyframe that's encountered.
-
Segmentation tab
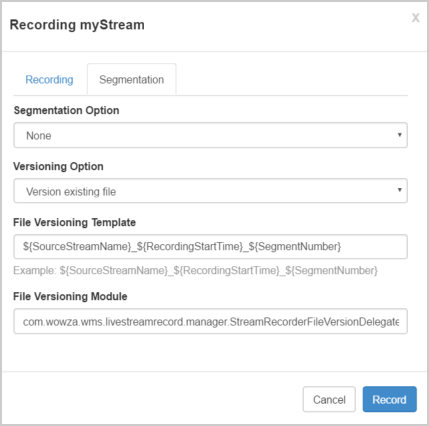
Segmentation Option -The segmentation options specify how live streams are recorded to multiple files. The split points can be based on the recorded file size or duration, or on a schedule:- None - Record the live stream to a single file (the default setting). The stream name is used as the filename. Select one of the following Versioning Options that specify what to do if the desired filename already exists:
- Append to existing file - Resume recording the live stream to the existing file.
- Version existing file - Start recording the live stream to a new file (the default setting). The live stream will be recorded to a new file with a filename in the format [streamName]_[segmentNumber], where [streamName] is the name of the stream and [segmentNumber] is a numeric value that increments by one for each new recorded segment of the stream. Note that when the Segmentation Option is set to None, the File Versioning Template isn't used to generate filenames.
- Overwrite existing file - Start recording the live stream to a new file with the same name as the existing file. This option will replace the previously recorded file with a new one.
- Append to existing file - Resume recording the live stream to the existing file.
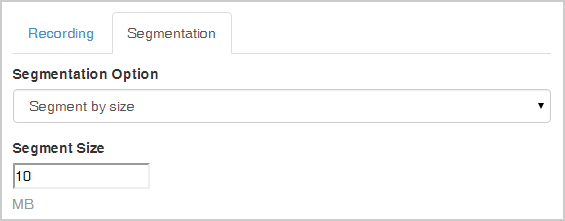
- Segment by size - Split the live stream into multiple on-demand files with a maximum size. Specify the maximum size value (in megabytes) in Segment Size. The minimum supported segment size is 1 MB. The live stream will be recorded to a new file with a filename that's generated by using the File Versioning Template value.
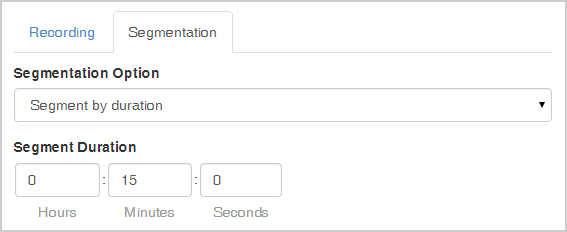
- Segment by duration - Split the live stream into multiple on-demand files with a maximum duration. Specify the maximum duration value (in Hours:Minutes:Seconds) in Segment Duration. The minimum supported segment duration is 10 seconds. The live stream will be recorded to a new file with a filename that's generated by using the File Versioning Template value.
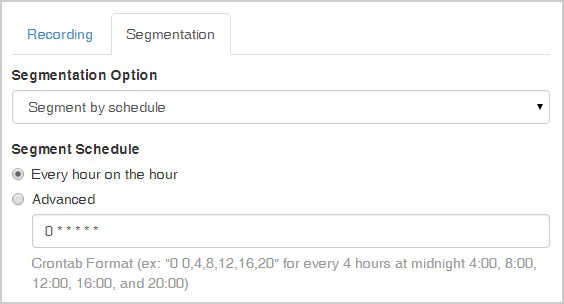
- Segment by schedule - Split the live stream into multiple on-demand files based on a schedule. Specify the schedule by selecting one of the following Segment Schedule options:
- Every hour on the hour - Split the recording into a new file at the top of each hour. This is the default setting.
- Advanced - Split the recording by using a customized segmentation schedule that's derived from a crontab expression.
- Every hour on the hour - Split the recording into a new file at the top of each hour. This is the default setting.
- File Versioning Template and File Versioning Module - If you select a Segmentation Option that requires live streams to be recorded to multiple files, the filenames of new recordings are created based on the template variables specified in the File Versioning Template by using the module specified in the File Versioning Module. For more information about template variable values that you can use in the File Versioning Template, see Defining filenames of recorded segments with template strings. To specify your own module that creates filenames, enter the custom module name in the File Versioning Module.
- None - Record the live stream to a single file (the default setting). The stream name is used as the filename. Select one of the following Versioning Options that specify what to do if the desired filename already exists:
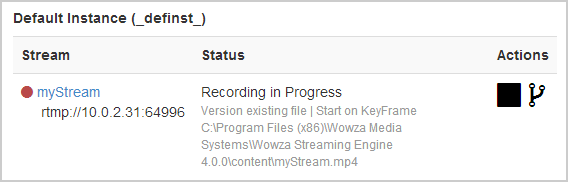
- Click Record to start recording the live stream.


After you click Record, Wowza Streaming Engine will start recording the live stream. The Recording dialog box will be removed and the underlying page updated with the new status of the live stream. You may need to click Refresh to display the most recent live stream status.
Stopping a recording
To stop recording a live stream, click the Stop recording icon next to a stream with a recording in progress.
Splitting a recording
To manually split an active recording, click the Split recording icon next to a stream with a recording in progress. This will cause Wowza Streaming Engine to switch the recording to a new file.
Record the live stream to multiple segmented files
To record and automatically segment a recording into multiple files, with the split points based on video duration, clock time, or file size, select one of the following combinations of options to specify how to segment the recorded files:
- To split the live stream into multiple on-demand files with a maximum size, on the Segmentation tab in the Recording dialog box, under Segmentation Options, select Start Recording Segment By Size. Then in the Segment Size box, specify the maximum file size in megabytes (MB). The default size is 10 MB.
- To split the live stream into multiple on-demand files with a maximum duration, on the Segmentation tab in the Recording dialog box, under Segmentation Options, select Start Recording Segment By Duration. Then in the Segment Duration box, specify the maximum duration in hours:minutes:seconds. The default value is 15 minutes (00:15:00).
- To split the live stream into multiple on-demand files based on a schedule, on the Segmentation tab in the Recording dialog box, under Segmentation Options, select Start Recording Segment By Schedule. Then in the Segment Schedule box, specify the schedule parameters by entering a crontab expression. The default value is to segment the recording into a new file at the top of each hour.
Note: Starting and stopping recordings using crontab expressions is not supported by Wowza Streaming Engine. This Segmentation Option is solely used to schedule when an active recording transitions to a new file (that is, segments the recording).


Record all incoming streams
To record all incoming streams, use the LiveStreamRecordAutoRecord module. Refer to Start recording streams automatically with a Wowza Streaming Engine Java module for details. This module enables you to record either all or selected incoming live streams on an application automatically using the default StreamRecorder parameters configured for the application.
You can also select the Record all incoming streams option on the Setup tab of the application page to record all streams published to the application by a live source. This recording option uses the live-record stream type and creates a recording with a file name that's the same as the source stream name in the application's streaming file directory. To stop recording all source streams to these application types, clear the Record all incoming streams option and restart the application.
Stream Recorder properties
Use the StreamRecorder properties to set the values to be used by Stream Recorders. The default StreamRecorder values are set in the initial settings displayed in the Recording dialog box.
(See the WSE Java API docs for a list of available StreamRecorder properties.)
Properties required to record WebRTC streams
To record a WebRTC live stream, you must configure the streamRecorderDefaultAudioSearchPosition and streamRecorderSkipKeyFrameUntilAudioTimeout properties. They ensure the audio and video are synchronized in the recording, and can be configured in WSE Manager or directly in a live application's Application.xml file. To configure these parameters using WSE Manager follow the steps below:
- Navigate to WSE Manager.
- At the top of the page, click the Applications tab.
- In the Content panel, click the name of your live application in the contents panel.
- Click the Properties tab.
- In the Quick Links bar, click StreamRecorder Defaults.
- Click Edit.
- Scroll to the
streamRecorderDefaultAudioSearchPositionproperty. - Select the Enabled check box.
- Scroll to the
streamRecorderSkipKeyFrameUntilAudioTimeoutproperty. - Select the Enabled check box.
- Set the
streamRecorderDefaultAudioSearchPositionproperty tofalse. (This tells WSE to synchronize the audio and video.) - Select a value for
streamRecorderSkipKeyFrameUntilAudioTimeout. (Default:1000)streamRecorderSkipKeyFrameUntilAudioTimeout: The maximum stream number of milliseconds that can be skipped while attempting to sync audio and video.
- Click Save.
Recording live streams programmatically with the LiveStreamRecordManager APIs
Wowza Streaming Engine includes the LiveStreamRecordManager Application Programming Interfaces (APIs) that enable you to have more programmatic control over live stream recordings. These APIs are fully documented in the com.wowza.wms.livestreamrecord.manager section in the Wowza Streaming Engine Java API reference documentation.
Some of the capabilities these APIs provide include:
- Start/Stop/Split Stream Recorders - (ILiveStreamRecordManager)
- Get a list of Stream Recorders - (ILiveStreamRecordManager)
- Register/Unregister for LiveStreamRecordManager events - (ILiveStreamRecordManagerActionNotify)
- Configure default parameters used by Stream Recorders via properties in Application.xml - (IStreamRecorderConstants)
- Configure Stream Recorders when starting a recording - (StreamRecorderParameter)
- Register/Unregister for Stream Recorder events - (IStreamRecorderActionNotify)
- Get detailed information about a specific Stream Recorder - (IStreamRecorder)
- Create custom code to version filenames used for the recorded segmented files of a live stream - (IStreamRecorderFileVersionDelegate)
Defining filenames of recorded segments with template strings
The default delegate allows you to specify a template string that defines the filenames of the recorded segments.
- public void setFileTemplate(String template) - Enables a custom filename template string to be specified.
- public String getFileTemplate() - Returns the current filename template string.
The template string can contain any valid filename characters as well as any valid template key, in any order.
These strings are for use with:
- Start Recording Segment By Size
- Start Recording Segment By Duration
- Start Recording Segment By Schedule
Valid template keys are:
- ${SourceStreamName} - The name of the live stream.
- ${SegmentNumber} - An incrementing value that represents the current number of recorded segments that have been created for this live stream, starting at 0.
- ${RecordingStartTime} - The time at which the recording was started.
- ${SegmentTime} - The time at which the recorded segment was created.
The default file template string is ${SourceStreamName}_${RecordingStartTime}_${SegmentNumber}, which generates recorded MP4 filenames such as the following:
myStream_2014-02-11-08.51.31.104-PDT_1.mp4
myStream_2014-02-11-08.51.31.104-PDT_2.mp4
Example template strings:
${SourceStreamName}_${SegmentNumber}:
mystream_1
mystream_2
${SourceStreamName}_t${RecordingStartTime}_ct${SegmentTime}:
mystream_t2014-02-11-02.34.53.102-PDT_ct2014-02-11-02.15.00.000-PDT
mystream_t2014-02-11-02.34.53.102-PDT_ct2014-02-11-02.30.00.000-PDT
Set a template for versioned recordings
You can use the default file template string in conjunction with the streamRecorderFileVersionTemplate StreamRecorder property to set a custom naming scheme for versioned recorded files.
For this use case, set the property in your Application.xml as in the following example:
<Property>
  <Name>streamRecorderFileVersionTemplate</Name>
  <Value>${SourceStreamName}_${SegmentTime}_${SegmentNumber}</Value>
  <Type>String</Type>
</Property>
For more information, see Stream Recorder properties and check our Java API reference for the IStreamRecorderConstants interface.
Troubleshooting
- Wowza Streaming Engine must be actively ingesting a live stream before you can start recording it.
- A recording must be completed before it can be played back.
- The Stream Recorder APIs are designed for server-side recording. Client-side recording, where multiple recording requests can be made for the same stream, isn't supported.
- When using the SegmentBy* APIs, the Version option is used and can't be changed.
- When resuming recording of a live stream to an existing file (append mode), unexpected results may occur if the existing file is larger than 4 gigabytes (GB).
Verifying settings by enabling additional debug logging
You can enable additional debug logging by enabling the streamRecorderDebugEnable property for a live application in Wowza Streaming Engine manager:
- In the Wowza Streaming Engine Manager contents panel, click the name of your live application.
- On the application page Properties tab, click StreamRecorder Defaults in the Quick Links bar.
Note: Access to the Properties tab is limited to administrators with advanced permissions. For more information, see Manage credentials.
- In the StreamRecorder Defaults area, click Edit.
- Click the Enabled check box for the streamRecorderDebugEnable property, and then select the option True for the property.

- Click Save.
- Click Restart in the upper-right corner of the application page to restart the application.

To configure [install-dir]/conf/[application]/Application.xml manually, open the file in a text editor and add the property to the <StreamRecorder>/<Properties> container in the file:
<Property>
    <Name>streamRecorderDebugEnable</Name>
    <Value>true</Value>
    <Type>boolean</Type>
</Property>
The debug log messages are recorded to the [install-dir]/logs/wowzastreamingengine_access.log file.
The following is an example log message with the streamRecorderDebugEnable property enabled. If you get unexpected results while recording, you can use the log message to confirm the settings that are being used.
comment server INFO 200 - [myApplication/_definst_]StreamRecorder:stopRecorder(): recording stopped: C:\Program Files (x86)\Wowza Media Systems\Wowza Streaming Engine 4.0.0\content\myStream.mp4
More resources
- Specify the legacy file version naming convention for recorded files in Wowza Streaming Engine
- Start recording streams automatically with a Wowza Streaming Engine Java module
- Plan your Wowza nDVR workflow
Appendix: About crontab expressions
In Wowza Streaming Engine, you can use crontab expressions to split a recording into multiple segmented files, based on a schedule.
The crontab expression specifies the split interval in minutes, hours, months, years, days of the month, or days of the week. The available crontab fields are (in order):
Where:
- <Minute> is the minute value (between 0 and 59) at which the split occurs.
- <Hour> is the hour (between 0 and 23 based on a 24-hour clock) at which the split occurs.
- <Day_of_the_Month> is the day (between 0 and 31) at which the split occurs. To specify that live recordings always be split on the last day of the month, specify 31.
- <Month_of_the_Year> is the month at which the split occurs. You can specify the month by using the abbreviated name of the month (for example, Jan) or a numerical equivalent (for example, 1).
- <Day_of_the_Week> is the day in a week at which the split occurs. You can specify the day by using the abbreviated name of the day (for example, Mon) or a numerical equivalent (for example, 1).
- <Year> is the year at which the split occurs (for example, 2014).
The crontab fields are meant to be used in combination in a cron expression (a string comprising the field values separated by white space) to give you a powerful mechanism for splitting your live recordings. You can also use special characters as field values to give you even more flexibility. Wowza Streaming Engine supports the nnCron cron format (http://www.nncron.ru/help/EN/working/cron-format.htm).
Example cron expressions:
The following are some simple examples that introduce cron expressions. For more advanced examples, see the nnCron cron format page (http://www.nncron.ru/help/EN/working/cron-format.htm).
To split a live recording every 30 minutes (at the top of each hour and every half-hour):
To split a live recording every 15 minutes on even hours:
To split a live recording at 8AM and 6PM:


